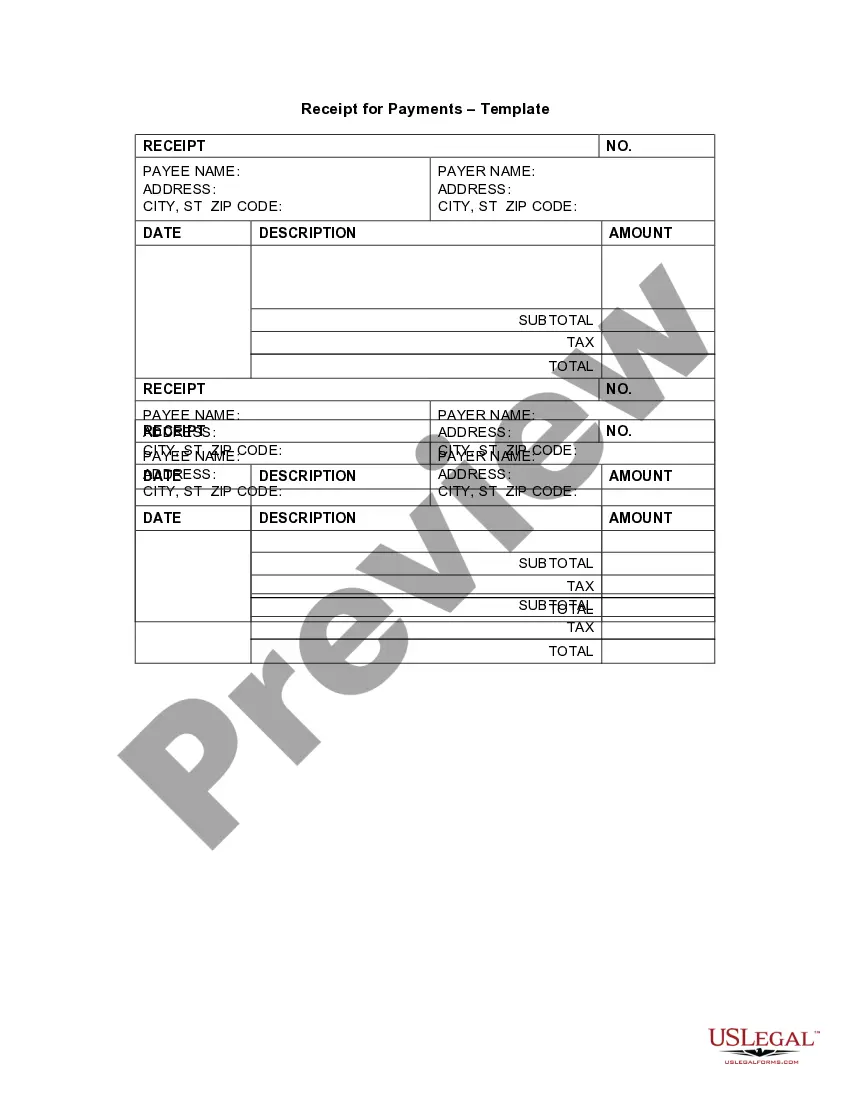
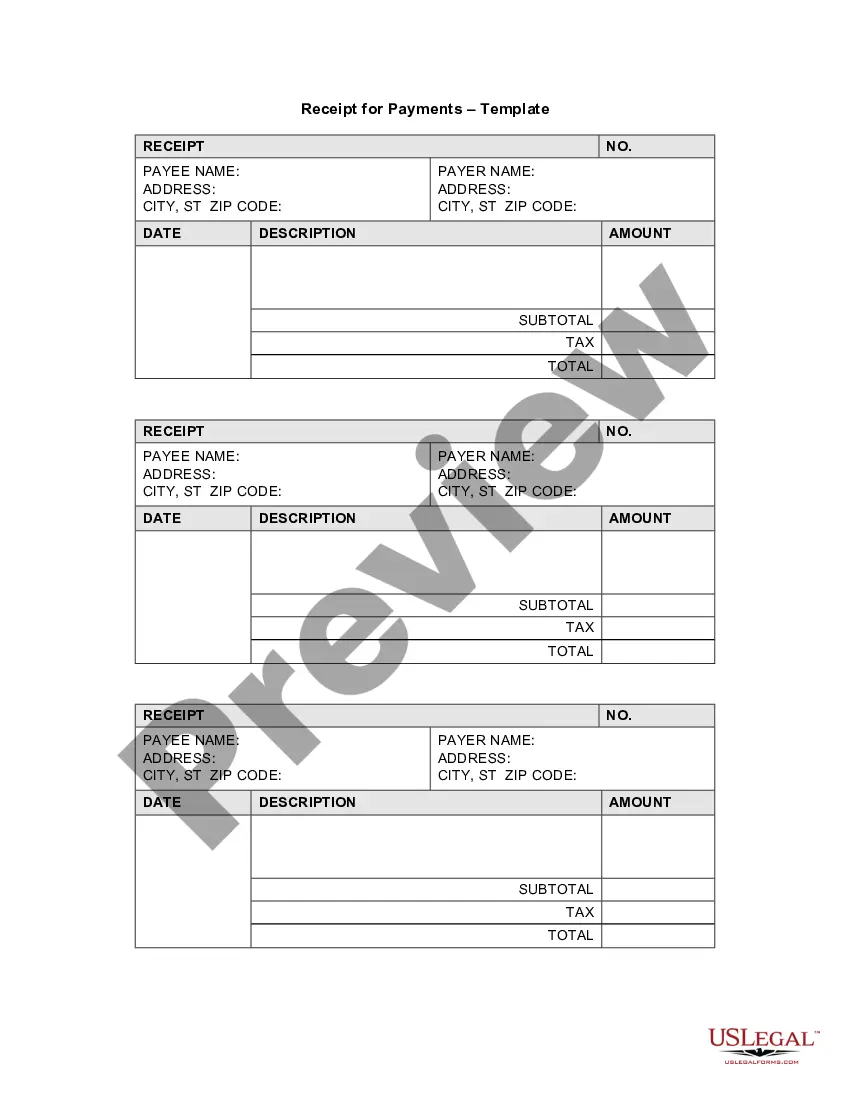
Receipt Template for Small Business
What is this form?
The Receipt Template for Small Business is a legal document used to acknowledge the receipt of payment from a customer or client. This form serves as proof of a transaction, helping small business owners keep clear records of their sales and financial exchanges. Unlike informal receipts, this template ensures that all necessary details are documented correctly and can be used for accounting purposes or in case of disputes.
Form components explained
- Payer information: Name and address of the person or business making the payment.
- Payee information: Name and address of the person or business receiving the payment.
- Date of transaction: The date when the payment was received.
- Description of goods or services: A brief description of what the payment is for.
- Amounts: Total amount paid, including any applicable taxes.
- Receipt number: A unique identifier for the transaction for record-keeping.


When to use this form
This form should be used whenever a small business completes a sale or receives payment for services rendered. It is particularly beneficial for maintaining accurate financial records, providing customers with proof of payment, and facilitating smooth accounting processes. Businesses should issue this receipt for each transaction to ensure both parties have an accurate account of their financial dealings.
Who needs this form
This form is suitable for:
- Small business owners who need to document customer payments.
- Freelancers and contractors providing services for various clients.
- Retailers or service providers wanting to maintain clear sales records.
- Businesses that require formal proof of transaction for accounting or tax purposes.
How to prepare this document
- Identify the payer: Enter the name and address of the person or business that made the payment.
- Fill in the payee information: Enter your business name and address in the designated area.
- Specify the date: Enter the date the payment was received.
- Describe the transaction: Write a brief description of the products or services rendered.
- Enter the amounts: Input the subtotal, tax, and total payment amounts in their respective fields.
- Assign a receipt number: Create a unique receipt number for tracking purposes.
Is notarization required?
This form does not typically require notarization unless specified by local law. It serves as a valid receipt of payment on its own.
Get your form ready online
Our built-in tools help you complete, sign, share, and store your documents in one place.
Make edits, fill in missing information, and update formatting in US Legal Forms—just like you would in MS Word.
Download a copy, print it, send it by email, or mail it via USPS—whatever works best for your next step.
Sign and collect signatures with our SignNow integration. Send to multiple recipients, set reminders, and more. Go Premium to unlock E-Sign.
If this form requires notarization, complete it online through a secure video call—no need to meet a notary in person or wait for an appointment.
We protect your documents and personal data by following strict security and privacy standards.

Make edits, fill in missing information, and update formatting in US Legal Forms—just like you would in MS Word.

Download a copy, print it, send it by email, or mail it via USPS—whatever works best for your next step.

Sign and collect signatures with our SignNow integration. Send to multiple recipients, set reminders, and more. Go Premium to unlock E-Sign.

If this form requires notarization, complete it online through a secure video call—no need to meet a notary in person or wait for an appointment.

We protect your documents and personal data by following strict security and privacy standards.
Avoid these common issues
- Neglecting to include the date of the transaction.
- Omitting payer or payee information.
- Forgetting to provide an itemized description of goods or services.
- Not assigning a unique receipt number for each transaction.
Why complete this form online
- Convenience: Easily download and fill out your receipt template from any location.
- Editability: Customize the template to suit your specific business needs.
- Reliability: Use a professionally drafted form that ensures compliance with legal standards.
- Accessibility: Keep digital records of all transactions for better organization and reporting.
Looking for another form?

Form popularity
FAQ
Include Contact Information. Add the Invoice Date. Establish a Simple Invoice Numbering System. List Your Services. Add Your Payment Terms. Include the Amount Due and the Payment Due Date.
Open your invoice template. Add the date. Enter the invoice number. Fill out the customer name, address, reference and/or order number. Enter a description of the goods or services. Total the costs and double-check your math.
Include Contact Information. Add the Invoice Date. Establish a Simple Invoice Numbering System. List Your Services. Add Your Payment Terms. Include the Amount Due and the Payment Due Date.
A Microsoft receipt template is just the ticket. A receipts template is free, customizable, and works well in a variety of situations.Browse the collection to find a template for receipt that fits your needs.
A Microsoft receipt template is just the ticket. A receipts template is free, customizable, and works well in a variety of situations.Browse the collection to find a template for receipt that fits your needs.
Click on the Office button on the top left icon on your screen, and select New from the drill down menu. Find the category Receipts and select the type you prefer. Click on the template that provides your need.
Open Microsoft Word. Click on File and select New. Enter Invoice into the search field, and Word will bring up all available invoice templates. If you're using Office Online, there is a series of templates on the homepage. Choose the template you want to use.
Add in your company details (name, address) in From section. Fill out client details (name, email, address) in For section. Write out line items with description, rate and quantity. Finish with the date, invoice number and your personalized brand.
Add in your company details (name, address) in From section. Fill out client details (name, email, address) in For section. Write out line items with description, rate and quantity. Finish with the date, invoice number and your personalized brand.