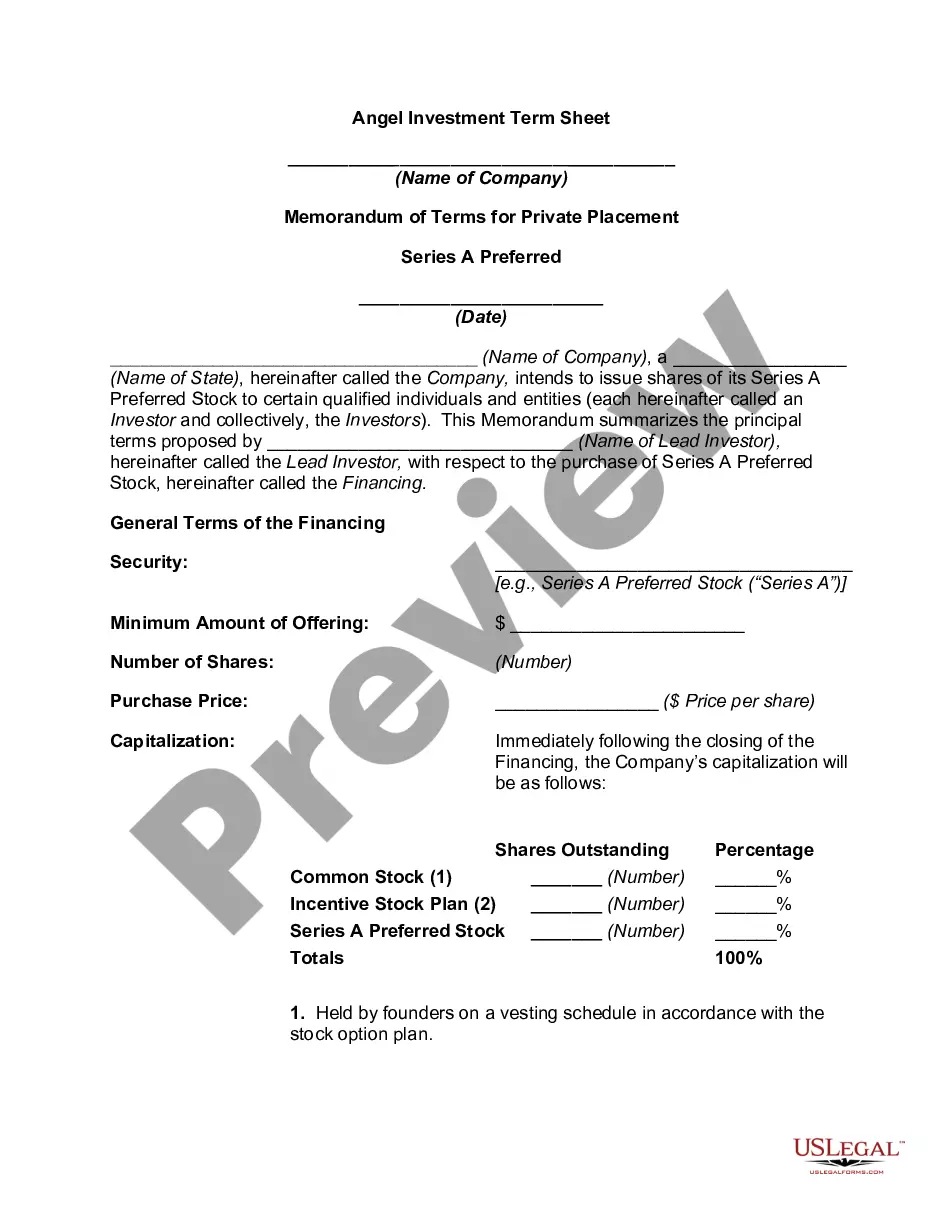
Invoice Template for HR Assistant
Understanding this form
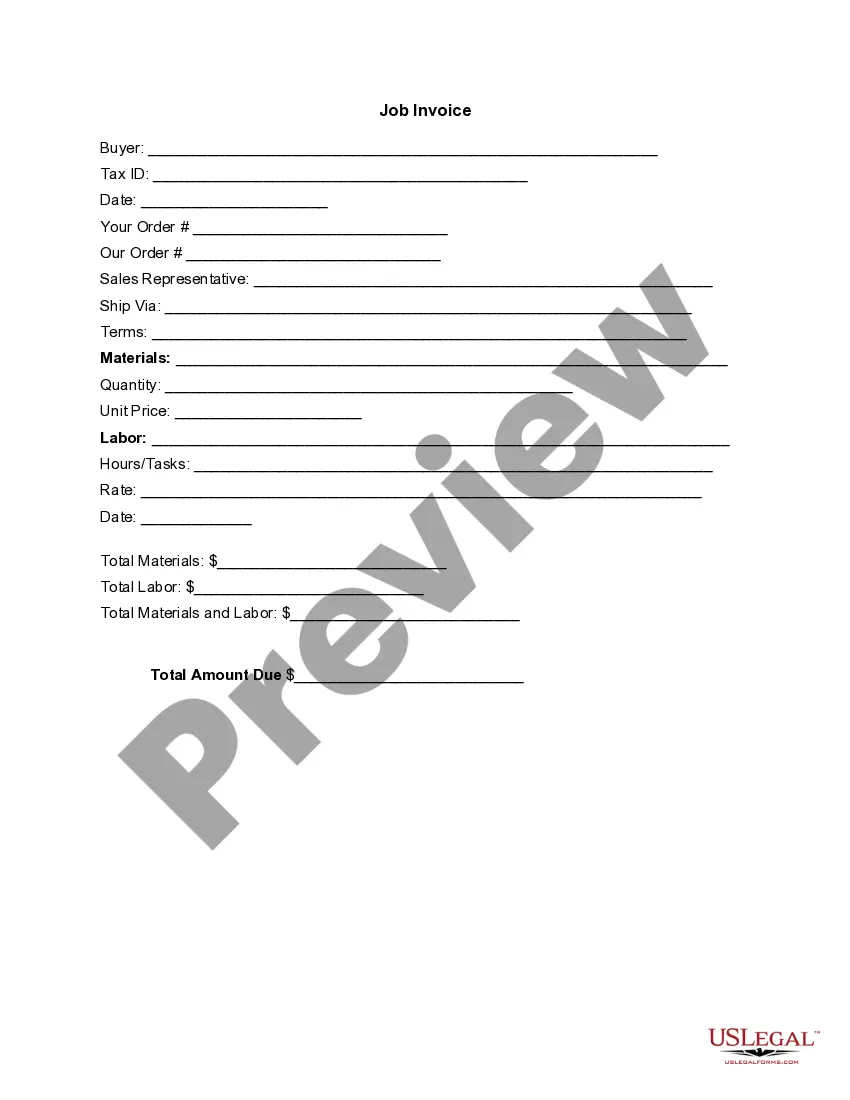
The Invoice Template for HR Assistant is a structured tool designed to detail the services rendered or goods provided to clients. This form serves as an itemized bill, specifically tailored for professionals in human resources or administrative roles, distinguishing itself from generic invoices by including elements relevant to human resource tasks. It aids in tracking labor and material costs associated with specific projects or services, ensuring clarity and accuracy in billing.
What’s included in this form
- Buyer information: includes the buyer's name and tax ID.
- Order details: specifies the order number and sales representative.
- Shipping information: outlines shipping method and terms.
- Material and labor sections: detail quantities, unit prices, and labor hours.
- Total amounts: calculates total materials, total labor, and overall total due.


Situations where this form applies
This Invoice Template for HR Assistant should be used when an HR assistant or administrative professional needs to bill clients for completed work or services. Use it after finishing a project, conducting training, or providing consultation services, ensuring all costs are documented clearly for client review and payment processing.
Intended users of this form
- Human resources assistants managing client projects.
- Administrative professionals involved in delivering services.
- Freelancers providing HR-related services.
- Anyone needing to invoice clients for completed tasks or services.
How to complete this form
- Identify the buyer by filling in their name and tax ID.
- Enter the date and order numbers for reference.
- Detail the materials used and the corresponding quantities and prices.
- Specify labor hours and rates for services provided.
- Calculate and input total costs for materials, labor, and the overall amount due.
Is notarization required?
This form does not typically require notarization unless specified by local law. Users should check their specific state requirements to ensure compliance.
Get your form ready online
Our built-in tools help you complete, sign, share, and store your documents in one place.
Make edits, fill in missing information, and update formatting in US Legal Forms—just like you would in MS Word.
Download a copy, print it, send it by email, or mail it via USPS—whatever works best for your next step.
Sign and collect signatures with our SignNow integration. Send to multiple recipients, set reminders, and more. Go Premium to unlock E-Sign.
If this form requires notarization, complete it online through a secure video call—no need to meet a notary in person or wait for an appointment.
We protect your documents and personal data by following strict security and privacy standards.

Make edits, fill in missing information, and update formatting in US Legal Forms—just like you would in MS Word.

Download a copy, print it, send it by email, or mail it via USPS—whatever works best for your next step.

Sign and collect signatures with our SignNow integration. Send to multiple recipients, set reminders, and more. Go Premium to unlock E-Sign.

If this form requires notarization, complete it online through a secure video call—no need to meet a notary in person or wait for an appointment.

We protect your documents and personal data by following strict security and privacy standards.
Common mistakes
- Not including all relevant materials and labor costs.
- Forgetting to add the tax ID or buyer's information.
- Neglecting to calculate totals accurately.
- Using incorrect dates or order numbers.
Benefits of using this form online
- Conveniently downloadable and editable, allowing for quick adjustments.
- Ensures accuracy and professionalism in invoicing.
- Provides a clear record of services delivered and payments expected.
Legal use & context
- Invoices are legal documents that create a binding agreement for payment.
- Accurate invoicing helps in maintaining a professional relationship with clients.
- Properly completed invoices can serve as evidence in case of disputes over payment.
Summary of main points
- The Invoice Template for HR Assistant is essential for accurately documenting services provided.
- Completing the form carefully helps avoid common billing errors.
- This form is versatile for use across multiple states.
Looking for another form?
Form popularity
FAQ
The name and contact details of your business. The client's contact information. A unique invoice number. An itemized summary of the services provided. Specific payment terms. The invoice due date. The total amount owing on the invoice.
Include Contact Information. Add the Invoice Date. Establish a Simple Invoice Numbering System. List Your Services. Add Your Payment Terms. Include the Amount Due and the Payment Due Date.
Label as an invoice. Your name and contact information. Invoice number. Date of the invoice. Billing period. Client name and address. A breakdown of services rendered. Hourly rates.
The name of your company. The name of your customer. The date the services were provided. Invoice number. A description of services rendered. Quantity of hours spent on services rendered. The price you're charging for the services or your hourly rate.
Download the Square Invoices app on your iOS or Android device. Create your free Square account or sign in with your existing Square account. Tap the '+' sign on the navigation bar and select 'Invoice'.When your clients receive the invoice in their email, they can pay you securely online.
Make your invoice look professional. The first step is to put your invoice together. Clearly mark your invoice. Add company name and information. Write a description of the goods or services you're charging for. Don't forget the dates. Add up the money owed. Mention payment terms.
Your name and contact information. Your client's name. Invoice number. Date of invoice issuance. Work order number or job code number. Payment due date. Current payment status. A description of your work or services rendered.
Basic blank invoice example Your business's name and contact information. Your customer's billing information. A description of the goods or services rendered. A due date (so you get paid on time)
A unique identification number. your company name, address and contact information. the company name and address of the customer you're invoicing. a clear description of what you're charging for. the date the goods or service were provided (supply date) the date of the invoice.