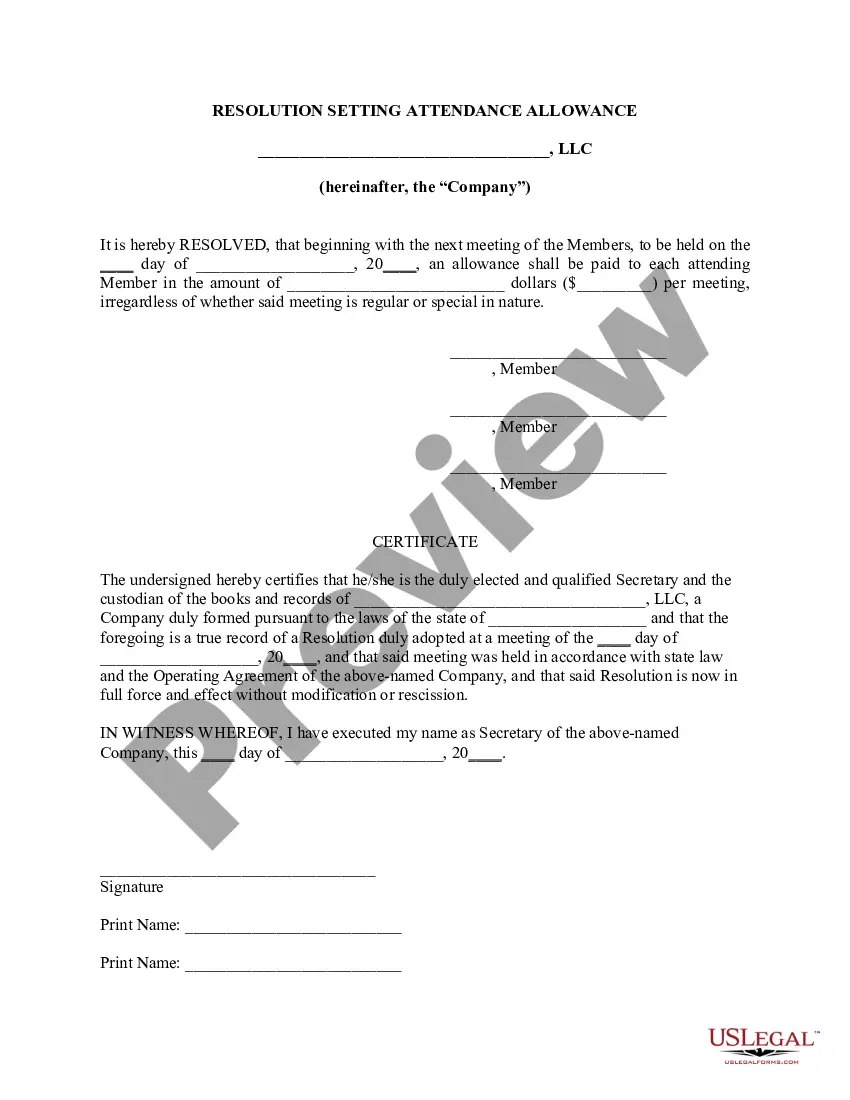
This form is a resoltuion of meeting of LLC Members to set the attendance allowance.
Resolution Llc Set With Xrandr
Category:
State:
Multi-State
Control #:
US-225LLC
Format:
Word;
Rich Text
Instant download
Description


Form popularity
FAQ
To set a specific resolution, use the xrandr command followed by your desired display settings. For instance, the command 'xrandr --output <display> --mode <desired_resolution>' allows you to specify a resolution. This capability to customize settings is a significant advantage of the resolution llc set with xrandr, ensuring your display meets your exact specifications.
Changing a display using xrandr involves first identifying your connected monitor. Once identified, you can use the command 'xrandr --output <display> --right-of <another_display>' to reposition displays. This flexibility to arrange monitors enhances your workspace efficiency, particularly when utilizing the resolution llc set with xrandr.
To set a resolution with xrandr, you start by opening a terminal and typing the command 'xrandr'. This command lists all compatible resolutions for connected devices. Next, you can use 'xrandr --output <display> --mode <resolution>' to apply your desired resolution, allowing for quick adjustments with the resolution llc set with xrandr.
The default display resolution varies based on the device and operating system settings. Common default resolutions include 1920x1080 for many monitors and laptops. By employing the resolution llc set with xrandr, you have the capability to change the default display resolution to align with your visual requirements.
The default Display of xrandr refers to the standard configuration used by your system's display server. When you execute the xrandr command, it will show the default display along with connected devices. Understanding the default display settings is crucial when using resolution llc set with xrandr to make necessary adjustments and optimizations.
The default display resolution for Raspberry Pi is typically set to 800x480 pixels for many models. However, this can vary based on the connected monitor and its supported resolutions. By using the resolution llc set with xrandr, you can easily customize the display settings to suit your specific needs and preferences.
The xrandr output provides detailed information about your display settings, including connected monitors, resolutions, and refresh rates. You can use this command in the terminal to identify how your system recognizes display devices. With the resolution llc set with xrandr, you can adjust resolution settings based on your needs and improve your overall viewing experience.
To force the active signal resolution, you can use the xrandr command to specify the desired resolution settings. First, list available outputs using 'xrandr' and identify your target display. Then, execute 'xrandr --output <display_name> --mode <desired_resolution>' to enforce the active signal resolution. This process demonstrates how to effectively manage the Resolution llc set with xrandr.
To check the current resolution on Ubuntu, simply open a terminal and run the command 'xrandr'. This command will display information about all connected displays and their resolutions. By doing so, you can easily monitor your display settings and ensure everything aligns with your expectations, including the Resolution llc set with xrandr.
To force your resolution to 1920x1080, utilize the xrandr tool from the command line. First, confirm that your monitor supports this resolution by running 'xrandr' and reviewing the list. Then, apply it using 'xrandr --output <display_name> --mode 1920x1080'. By following these steps, you successfully implement the Resolution llc set with xrandr.