Release Letter Sample With Enclosure In San Diego
Description
Get your form ready online
Our built-in tools help you complete, sign, share, and store your documents in one place.
Make edits, fill in missing information, and update formatting in US Legal Forms—just like you would in MS Word.
Download a copy, print it, send it by email, or mail it via USPS—whatever works best for your next step.
Sign and collect signatures with our SignNow integration. Send to multiple recipients, set reminders, and more. Go Premium to unlock E-Sign.
If this form requires notarization, complete it online through a secure video call—no need to meet a notary in person or wait for an appointment.
We protect your documents and personal data by following strict security and privacy standards.

Make edits, fill in missing information, and update formatting in US Legal Forms—just like you would in MS Word.

Download a copy, print it, send it by email, or mail it via USPS—whatever works best for your next step.

Sign and collect signatures with our SignNow integration. Send to multiple recipients, set reminders, and more. Go Premium to unlock E-Sign.

If this form requires notarization, complete it online through a secure video call—no need to meet a notary in person or wait for an appointment.

We protect your documents and personal data by following strict security and privacy standards.
Looking for another form?
Form popularity
FAQ
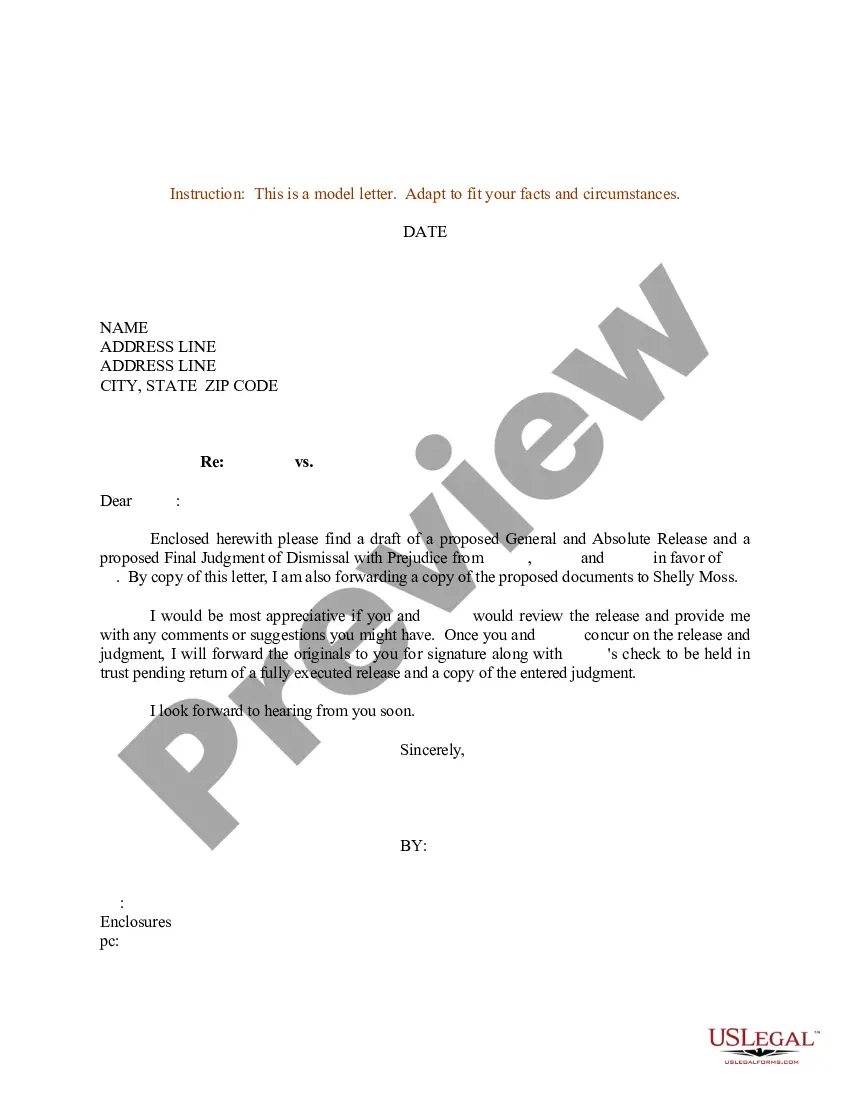
On a paper business letter, you often include the CC line underneath your signature, either above or below any enclosures line.
The point is to alert the person who has received the letter that others directly involved with the letter have also been copied on it. In a printed letter, the CC line might go before or after the enclosures line. Whichever you choose, it needs to be below the signature line.
In a printed letter, the CC line might go before or after the enclosures line. Whichever you choose, it needs to be below the signature line.
Under your name at the end of the letter, skip two lines. On the third line, write "Enclosure:" or "Enclosures:" if there are multiple documents. Skip a line after "Enclosures:" and then begin your list of enclosures. Put each enclosed document title on its own line.
Key points to remember when writing a cover letter enclosure: Always include the enclosure at the end of the cover letter. Leave two line-space between your name and enclosure. Ensure to write “Enclosures:” for multiple documents and “Enclosure:” for a single document. Write the document names in single lines.
If something is enclosed with a letter, the notation “Enclosure” is typed a double-space below the writer's initials and/or typist's initials. If more than one item is enclosed, the word is made plural and followed by the number of items (e.g., “Enclosures 2”).
If something is enclosed with a letter, the notation “Enclosure” is typed a double-space below the writer's initials and/or typist's initials. If more than one item is enclosed, the word is made plural and followed by the number of items (e.g., “Enclosures 2”).
Note the attachments Under your name and title, type “Enclosure:” or “Attachment:” to indicate that you've included additional documents. On the next line, provide a brief description of the contents. In a typical letter with an attachment, you might state “Curriculum Vitae,” for example.
Depending on the type of letter and delivery method, there are different ways to indicate attachments and enclosures. For instance, if sending a business letter by mail or courier, you can write “Enclosure(s)” or “Encl.” at the bottom of the letter, followed by a list of the enclosed documents or files.
Here is how to write a request letter in 7 steps: Collect information relating to your request. Create an outline. Introduce yourself. 4. Make your request. Explain the reason for the request. Offer to provide additional information. Show your gratitude and conclude the letter.