Contractor Time Template With Tax
Description

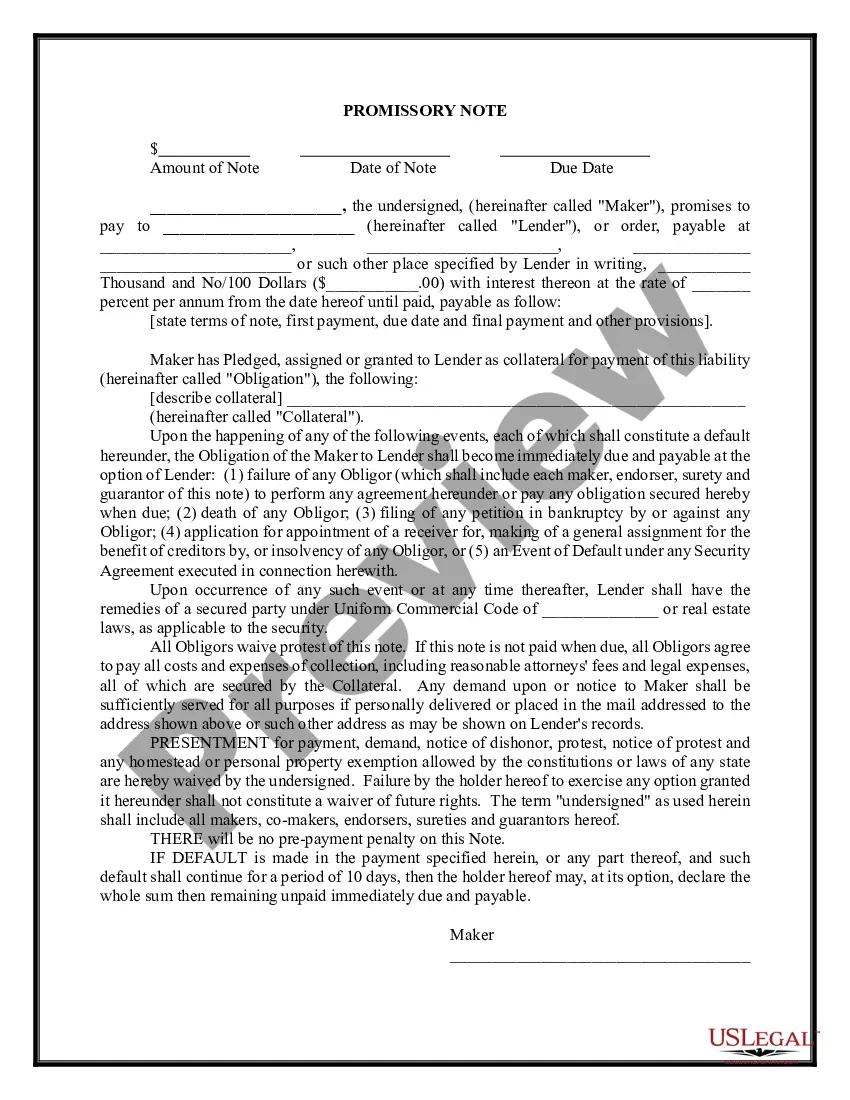

How to fill out Contractor's Time And Materials Log?
Whether for commercial reasons or for private issues, everyone must confront legal circumstances at some stage in their existence.
Completing legal documents necessitates meticulous focus, beginning with selecting the correct form template. For example, if you choose an incorrect version of the Contractor Time Template With Tax, it will be rejected upon submission. Thus, it is crucial to obtain a trustworthy source of legal documents such as US Legal Forms.
With an extensive US Legal Forms catalog available, you never need to waste time searching for the appropriate sample across the web. Utilize the library’s user-friendly navigation to find the right template for any occasion.
- Locate the sample you require using the search bar or catalog navigation.
- Examine the form’s details to ensure it corresponds with your situation, state, and county.
- Click on the form’s preview to view it.
- If it is the wrong document, return to the search feature to find the Contractor Time Template With Tax sample you need.
- Download the template once it satisfies your requirements.
- If you possess a US Legal Forms account, simply click Log in to access previously saved documents in My documents.
- If you do not have an account yet, you can acquire the form by clicking Buy now.
- Select the suitable pricing option.
- Fill out the profile registration form.
- Choose your payment method: you may use a credit card or PayPal account.
- Select the file format you desire and download the Contractor Time Template With Tax.
- After it is saved, you can complete the form using editing software or print it and fill it out manually.
Form popularity
FAQ
The basics of filling out timesheets remain the same for both paper timesheets and timesheet software. Step 1 - Name and Surname. ... Step 2 - Date. ... Step 3 - Project Details. ... Step 4 - Add Working Hours. ... Step 5 - Calculate the Hours. ... Step 6 - Notes. ... Step 7 - Approval.
The basics of filling out timesheets remain the same for both paper timesheets and timesheet software. Step 1 - Name and Surname. ... Step 2 - Date. ... Step 3 - Project Details. ... Step 4 - Add Working Hours. ... Step 5 - Calculate the Hours. ... Step 6 - Notes. ... Step 7 - Approval.
The 7 Best Time Tracking Apps for Contractors for 2023 Connecteam ? Best all-in-one time tracking app for contractors. ... Timecamp ? Good for automatically tracking billable hours. ... QuickBooks Time ? Good for integrating with payroll. ... Harvest ? Good for tracking budgets for multiple clients and projects.
How to fill out a time card in 5 simple steps Employee Name & Social Security Number. ... Date and Start/End Times. ... Recording Breaks. ... Calculate Time Worked. ... Time Card Approval.
How to fill out a timesheet (step-by-step guide) Step 1: Enter the employee's name. ... Step 2: Add the date or date range. ... Step 3: Fill in the project and task details. ... Step 4: Add working hours for each day of the week. ... Step 5: Calculate the total hours. ... Step 6: Add notes if required. ... Step 7: Get approval.
