Power Automate Forms Excel
Description


Get your form ready online
Our built-in tools help you complete, sign, share, and store your documents in one place.
Make edits, fill in missing information, and update formatting in US Legal Forms—just like you would in MS Word.
Download a copy, print it, send it by email, or mail it via USPS—whatever works best for your next step.
Sign and collect signatures with our SignNow integration. Send to multiple recipients, set reminders, and more. Go Premium to unlock E-Sign.
If this form requires notarization, complete it online through a secure video call—no need to meet a notary in person or wait for an appointment.
We protect your documents and personal data by following strict security and privacy standards.

Make edits, fill in missing information, and update formatting in US Legal Forms—just like you would in MS Word.

Download a copy, print it, send it by email, or mail it via USPS—whatever works best for your next step.

Sign and collect signatures with our SignNow integration. Send to multiple recipients, set reminders, and more. Go Premium to unlock E-Sign.

If this form requires notarization, complete it online through a secure video call—no need to meet a notary in person or wait for an appointment.

We protect your documents and personal data by following strict security and privacy standards.
Looking for another form?
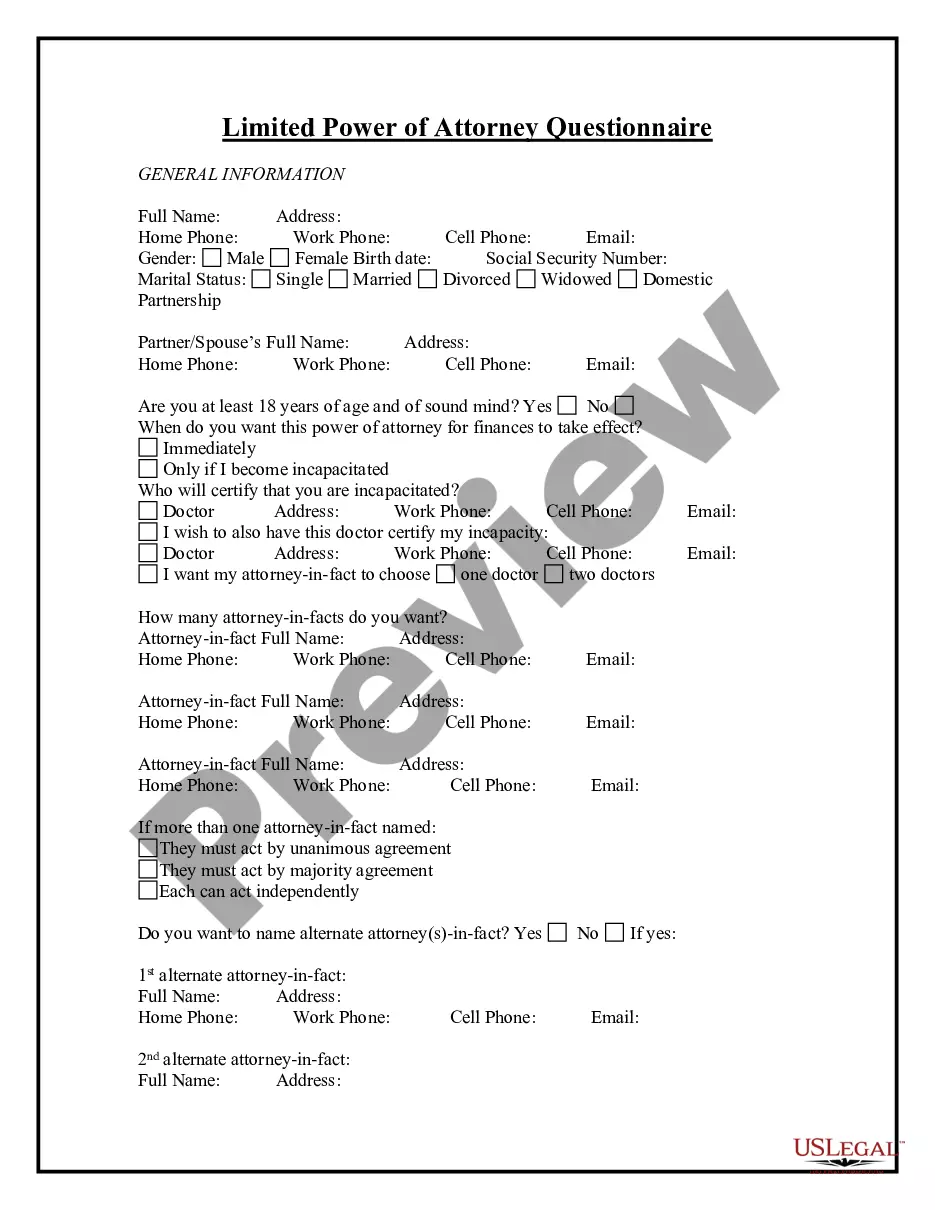
How to fill out Colorado Special Durable Power Of Attorney For Bank Account Matters?
- If you have previously used US Legal Forms, log into your account and verify your subscription status. Click 'Download' to save the required form template to your device.
- For first-time users, start by browsing form previews and descriptions to find the document that fits your needs and complies with local laws.
- Should you find your chosen form unsatisfactory, utilize the search option to find alternative templates that better suit your requirements.
- Proceed to purchase the form by clicking on 'Buy Now' and select a suitable subscription plan. Creating an account will provide you access to a wealth of resources.
- Complete the payment by entering your credit card information or using PayPal, and confirm your purchase.
- Finally, download the form to your device and access it anytime via the 'My Forms' section in your profile for further use.
In conclusion, US Legal Forms offers a vast selection of legal documents and expert support to ensure your forms are both accurate and compliant. This user-friendly service streamlines the process of obtaining legal paperwork, saving you time and effort.
Ready to simplify your legal form needs? Visit US Legal Forms today!
Form popularity
FAQ
Getting Microsoft Forms in Excel is easy and can be done through Power Automate. You can start by creating a flow that collects form responses directly into your Excel spreadsheet. Select the appropriate Microsoft Form in your flow settings, and you'll receive organized data in Excel. This integration between Power Automate forms and Excel truly enhances your data management experience.
To enable Power Automate in Excel, follow a similar process as you do with other add-ins. Open Excel and navigate to the 'Insert' tab. Then, select 'Get Add-ins' and search for Power Automate in the store. This installation allows you to seamlessly integrate your Power Automate forms in Excel and maximize your data processing capabilities.
Enabling Power Automate in Excel requires you to check your Office 365 subscription for access to the feature. Once confirmed, open Excel, go to the 'Insert' tab, and look for 'Get Add-ins' or 'Office Add-ins.' Search for Power Automate, install it, and then you'll be ready to use Power Automate forms in Excel to streamline your workflow and increase efficiency.
To turn on Power Automate, navigate to the official Power Automate website and log in with your Microsoft account. Once logged in, you'll have access to various templates and tools. After selecting a template or creating a new flow, you can begin utilizing Power Automate to manage and automate processes with your Power Automate forms in Excel.
Yes, you can trigger Power Automate flows directly from Excel. This is accomplished by creating button-based flows using Excel Online or incorporating Excel data into your flow’s parameters. As you explore this functionality, you can greatly enhance how you work with Power Automate forms in Excel, streamlining your tasks and improving productivity.
To get form responses using Power Automate, start by creating a new flow from the Power Automate dashboard. Choose 'When a new response is submitted' as your trigger. You can then specify which Microsoft Form to connect with and select the actions you want to take using Excel. This process allows you to automate data extraction, simplifying how you manage Power Automate forms in Excel.
To enable the automate tab in Excel, you need to ensure that you have the necessary permissions for using Power Automate. First, open Excel and navigate to the 'File' menu, then select 'Options.' From there, click on 'Add-Ins' and manage your add-ins to include Power Automate. Once you do this, the automate tab should appear in your Excel ribbon, allowing you to create and manage Power Automate forms in Excel.
Using Power Automate to update Excel from forms is a powerful method to keep your data fresh. Start by creating a flow that triggers on form submission in Microsoft Forms. Configure the flow to add or update records in your Excel file, allowing you to automate data management seamlessly. This dynamic integration ensures your Excel sheet always reflects the latest submissions.
Filling out a form in Excel typically involves using data entry fields within the Excel application itself. However, if you utilize Microsoft Forms linked through Power Automate, users can fill out form fields that feed directly into Excel. This setup allows for organized data gathering, ensuring simplicity and efficiency.
Prefilling data in Microsoft Forms can streamline form completion for users. You can set up defaults for fields using query strings in the URL when sharing your form. Although Power Automate does not directly support this feature, using it to gather data can enhance how you manage responses and minimize the information users need to fill out.