Loading
Get New Clinic/facility Information Form - Preferredone
How it works
-

Open form follow the instructions
-

Easily sign the form with your finger
-

Send filled & signed form or save
How to fill out the New Clinic/Facility Information Form - PreferredOne online
This guide provides essential instructions for users on how to effectively complete the New Clinic/Facility Information Form for PreferredOne online. Clear and precise steps will help ensure that all necessary information is submitted accurately.
Follow the steps to successfully complete the New Clinic/Facility Information Form.
- Press the ‘Get Form’ button to access the form and open it in your preferred editor.
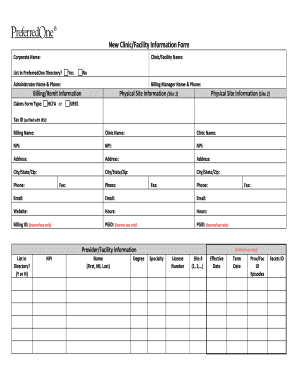
- Begin by filling out the corporate name and the clinic/facility name accurately, as this information will be used for all future communications.
- Indicate whether you want your clinic/facility listed in the PreferredOne directory by selecting 'Yes' or 'No'.
- Provide the administrator's name and their phone number, followed by the billing manager's name and phone number.
- In the billing/remit information section, select the claims form type relevant to your facility: HCFA or UB92.
- Fill out the tax ID as it is filed with the IRS, along with the billing name and clinic name. Make sure to provide the NPI numbers where requested.
- Complete the physical site information for both site 1 and site 2, including address, city/state/zip, phone, fax, and email for each site.
- State the website and the hours of operation for each physical site.
- In the provider/facility information section, confirm whether the provider should be listed in the directory and complete all relevant fields, including NPI, name, degree, license number, and effective and term dates.
- Carefully fill out the details for the mental health and substance-related disorder services if applicable, adding any specializations as required.
- Complete any internal use sections as necessary, ensuring all provided information is accurate.
- Once all sections are filled out, review the form for accuracy. Save your changes, then download, print, or share the form as needed.
Complete your documents online with confidence and ensure all required fields are thoroughly filled out.
In Windows Explorer (or Windows Photo Viewer), right mouse click on a photo a select Properties. In the dialog box that pops up, select "Details." There is a section called "Description" with the fields: Title, Subject, Rating, Tags, and Comments.
Industry-leading security and compliance
US Legal Forms protects your data by complying with industry-specific security standards.
-
In businnes since 199725+ years providing professional legal documents.
-
Accredited businessGuarantees that a business meets BBB accreditation standards in the US and Canada.
-
Secured by BraintreeValidated Level 1 PCI DSS compliant payment gateway that accepts most major credit and debit card brands from across the globe.