Loading
Get Blood Pressure Measurement Technique
How it works
-

Open form follow the instructions
-

Easily sign the form with your finger
-

Send filled & signed form or save
How to fill out the Blood Pressure Measurement Technique online
This guide will assist you in accurately completing the Blood Pressure Measurement Technique online form. Following these detailed instructions will ensure that all necessary components are properly addressed, resulting in reliable blood pressure measurement documentation.
Follow the steps to complete the Blood Pressure Measurement Technique form effectively.
- Press the ‘Get Form’ button to access the blood pressure measurement technique form. This will allow you to open the document in an online editor for completion.
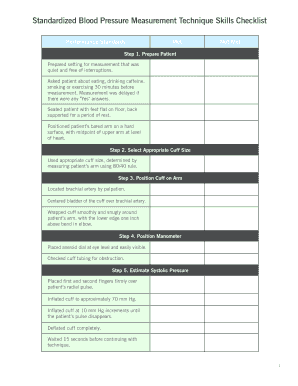
- Begin by preparing the patient. Ensure the setting is quiet and free from interruptions. Ask the patient about their eating, caffeine intake, smoking, or exercising in the 30 minutes prior to measurement. If any of their responses are 'Yes,' delay the measurement. Seat the patient with feet flat on the floor and back supported to allow for a period of rest before measurement. Position the patient’s bared arm on a hard surface with the midpoint of the upper arm at heart level.
- Select the appropriate cuff size. This is determined using the 80/40 rule—measure the patient’s arm to ensure the correct cuff size is used for accuracy.
- Locate the brachial artery by palpation. Center the bladder of the cuff over the brachial artery, wrapping it smoothly and snugly around the patient's arm, keeping the lower edge one inch above the bend in the elbow.
- Position the aneroid dial at eye level for easy visibility. Check the cuff tubing for any obstruction that might affect the measurement.
- Estimate the systolic pressure by placing your first and second fingers firmly over the patient’s radial pulse. Inflate the cuff to approximately 70 mm Hg, then increase at 10 mm Hg increments until the radial pulse disappears. Deflate the cuff completely and wait for 15 seconds before proceeding.
- Prepare the stethoscope by placing the earpieces in your ears with the angle facing forward and positioning the stethoscope head in the bell position.
- Position the bell side of the stethoscope over the brachial artery. Inflate the cuff quickly to a level that is 20-30 mm Hg above your palpation estimate, then deflate the cuff at a steady rate of 2-3 mm Hg per second.
- Identify the Korotkoff sounds and document the systolic (Phase 1) and diastolic (Phase 5, or 4 if Phase 5 is absent) blood pressure readings.
- Continue to deflate the cuff, ensuring that you deflate at least an additional 10 mm Hg after hearing Phase 4. Quickly deflate the cuff completely afterwards.
- Record the blood pressure values, noting both the systolic and diastolic readings. Also document the cuff size used, the arm that was measured, and the patient's position if they were not seated.
- Recheck the blood pressure after waiting one to two minutes. Use the same arm as before for consistency. Record both measurements obtained and explain the results to the patient, discussing any recommended follow-up.
- Finally, ensure all changes are saved, and consider downloading, printing, or sharing the completed form as needed.
Complete the Blood Pressure Measurement Technique form online today to enhance your documentation accuracy.
The correct technique for taking blood pressure includes choosing a suitable cuff size, allowing the patient to relax, and placing the cuff snugly around the arm. Then, inflate the cuff and gradually release pressure while listening for heartbeats, accurately recording the systolic and diastolic readings.