Get Hcs Multimedia Tutorials - Scanning Text 6 Introduction: The Most ...
How it works
-

Open form follow the instructions
-

Easily sign the form with your finger
-

Send filled & signed form or save
How to fill out the HCS Multimedia Tutorials - Scanning Text 6 Introduction online
This guide provides clear instructions on how to fill out the HCS Multimedia Tutorials - Scanning Text 6 Introduction form online. Follow the steps carefully to ensure a seamless experience in converting your paper documents into electronic format using OmniPage Pro 9.0.
Follow the steps to successfully complete the form.
- Click the ‘Get Form’ button to access the form and open it in the designated platform.
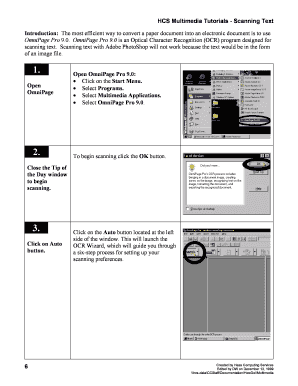
- Begin by launching OmniPage Pro 9.0. Navigate to the Start Menu, select Programs, and then choose Multimedia Applications followed by OmniPage Pro 9.0. Click the OK button to start the scanning process and close any introductory prompts.
- Select the Auto button located on the left side of the window to initiate the OCR Wizard. This will guide you through the steps for configuring your scanning preferences.
- In Step 1 of the OCR Wizard, choose how you will obtain your image by selecting 'By scanning a paper document' and decide on the scanning mode: black and white, grayscale, or color. Once selected, click the Next button.
- Proceed to Step 2 of the OCR Wizard and determine the layout of your original image. Options include single column, multiple columns, or mixed page layout. Make your selection based on the document's formatting and click Next.
- In Step 3 of the OCR Wizard, identify the primary language of your document. Check the boxes that signify additional time for reviewing tables. After completing this, proceed by clicking Next.
- At Step 4 of the OCR Wizard, decide whether to retain the original formatting. Options include removing all formatting, preserving font and paragraph structure, or retaining the layout as closely as possible. Select your preference and continue by clicking Next.
- In Step 5 of the OCR Wizard, specify whether you wish to proofread the OCR results before exporting. Opt for the highest accuracy settings. Click Next to continue.
- In the final Step 6 of the OCR Wizard, select your export preferences. Choose 'Save to disk' for saving to your designated drive and ensure to check 'Retain graphics if possible.' Click Next.
- Prepare your document in the scanner, ensuring proper alignment. Once positioned correctly, press the OK button.
- After scanning, decide whether to scan additional pages or halt the process based on your document length.
- When saving your file, confirm the correct destination in the Save As window. Use a succinct and descriptive file name and be sure to save in rich text format for optimal formatting retention.
- As a final step, reopen your document in Microsoft Word, perform a spell check, and save it as a Word document.
Complete your documents online by following these steps for effective scanning and formatting.
Creating a Padlet video involves a few steps. First, log in to your Padlet account and create a new post. You can upload your video file or paste a video link into the post. Once your video is added, customize the title and description, then publish it for others to see. HCS Multimedia Tutorials - Scanning Text 6 Introduction: The Most ... can provide additional context on easily using digital tools.
Industry-leading security and compliance
-
In businnes since 199725+ years providing professional legal documents.
-
Accredited businessGuarantees that a business meets BBB accreditation standards in the US and Canada.
-
Secured by BraintreeValidated Level 1 PCI DSS compliant payment gateway that accepts most major credit and debit card brands from across the globe.