Loading
Get Maintaining Customer Contact Information_jobaid
How it works
-

Open form follow the instructions
-

Easily sign the form with your finger
-

Send filled & signed form or save
How to use or fill out the Maintaining Customer Contact Information_JOBAID online
This guide provides a comprehensive overview of how to fill out the Maintaining Customer Contact Information_JOBAID online. By following the steps outlined below, users can effectively manage customer contact details with ease and accuracy.
Follow the steps to fill out the Maintaining Customer Contact Information_JOBAID online.
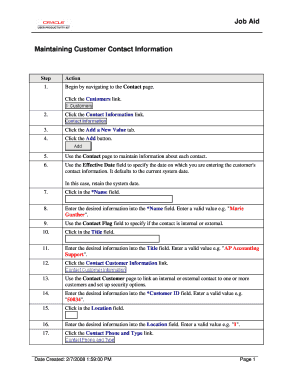
- Begin by navigating to the Contact page. Click the Customers link to access the relevant section for customer details.
- Click the Contact Information link to reach the area dedicated to managing customer contact information.
- Select the Add a New Value tab, which allows you to add new contact information.
- Click the Add button to start entering details for a new contact.
- Utilize the Contact page to maintain information about each contact, ensuring all relevant data is captured.
- In the Effective Date field, specify the date on which you are entering the customer's contact information. The system defaults to the current date, which you can retain.
- Click in the Name field to begin entering the contact's name.
- Enter the desired information into the Name field, for example, 'Marie Gunther'. Make sure to input a valid name.
- Use the Contact Flag field to indicate if the contact is internal or external, selecting the appropriate option.
- Click in the Title field to enter the contact's job title.
- Provide the job title in the Title field, such as 'AP Accounting Support', ensuring that it accurately reflects the contact's position.
- Click the Contact Customer Information link to manage the relationship between the contact and customers.
- Link the contact to one or more customers and set up security options in the Contact Customer page.
- Enter the desired information into the Customer ID field; for example, '50034'. This is essential for linking the contact to the correct customer.
- Click in the Location field to provide details about the contact's location.
- Enter the desired information into the Location field, such as '1', indicating the relevant location.
- Click the Contact Phone and Type link to specify the contact's phone details.
- Use the Contact Phone and Type page to input phone numbers and contact types for the internal and external contacts.
- Enter a valid value in the Phone Type field, such as 'BUSN', to classify the phone type.
- Click in the Phone Number field to input the phone number.
- Enter the desired phone number, for example, '4045641913', ensuring the format is correct.
- Click in the Extension field to add a phone extension if necessary.
- Input the extension information in the Extension field, using a valid value like '321'.
- Click the Add Row button to add more phone numbers if needed.
- For additional phone types, enter a value in the Phone Type field, such as 'FAX'.
- Click in the Phone Number field to specify the additional phone number.
- Enter the additional phone number, for example, '4045641901', ensuring it is accurately recorded.
- Click the Contact Customer Information link again to proceed with additional data.
- Select the Additional Contact Information link to manage more details such as documents and preferred communication methods.
- On the Contact Additional Info page, choose the documents for external contacts and specify their preferred communication method.
- Click in the Card Type field to enter information about payment methods.
- Input the desired information into the Card Type field, for example, '04'.
- Click in the Card Number field to provide the credit card number.
- Enter the relevant card number, e.g., '378521154152002', ensuring it is correct.
- Click the Primary Card option to designate this card as the primary payment method.
- Click in the Last Name field to enter the last name associated with the card.
- Provide the last name in the Last Name field, such as 'Gernz and Associates'.
- Click in the Expiration Month field to specify the card's expiration month.
- Enter the desired expiration month in the Expiration Month field, for example, '12'.
- Click in the Expiration Year field to specify the card's expiration year.
- Input the expiration year in the Expiration Year field, such as '2008'.
- Click in the Address Sequence Number field to provide the sequence of the address if applicable.
- Enter the desired information into the Address Sequence Number field, using a valid value like '1'.
- Use the Document Code field to specify which documents the contact will receive. Click in the Document Code field.
- Enter the desired document code in the Document Code field, for example, 'INVN'.
- Use the Preferred Communication field to indicate how the contact prefers to receive documents. Click in the Preferred Communication field.
- Input the preferred communication method in the Preferred Communication field, such as 'M'.
- Click the Save button to save all the information you have entered.
- You have successfully updated the customer's contact information. Review your entries, and proceed as necessary.
Start completing your documents online now to ensure accurate and timely management of customer information.
So make sure your reps can speak confidently, stay positive, and offer the kind of compelling arguments that lead to conversions. Empathy. ... Adaptability. ... Ability to Use Positive Language. ... Clear Communication Skills. ... Self-Control. ... Taking Responsibility. ... Patience. ... Effective Listening.
Industry-leading security and compliance
US Legal Forms protects your data by complying with industry-specific security standards.
-
In businnes since 199725+ years providing professional legal documents.
-
Accredited businessGuarantees that a business meets BBB accreditation standards in the US and Canada.
-
Secured by BraintreeValidated Level 1 PCI DSS compliant payment gateway that accepts most major credit and debit card brands from across the globe.