Loading
Get Cp Plus Dvr Firmware Update Download
How it works
-

Open form follow the instructions
-

Easily sign the form with your finger
-

Send filled & signed form or save
How to fill out the Cp Plus Dvr Firmware Update Download online
This guide offers a comprehensive overview of how to effectively fill out the Cp Plus Dvr Firmware Update Download. It provides step-by-step instructions designed to assist users in successfully completing the necessary fields.
Follow the steps to properly complete the Cp Plus Dvr Firmware Update Download form.
- Press the ‘Get Form’ button to obtain the form and open it in the editor.
- Read the instructions thoroughly to understand the requirements for filling out the form. This will help set the necessary context for the subsequent steps.
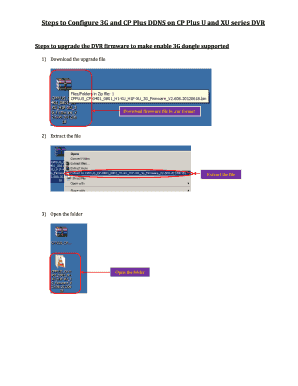
- Download the firmware upgrade file in .rar format to your computer.
- Extract the downloaded .rar file to access the contents. This usually involves right-clicking the file and selecting 'Extract' or 'Extract Here'.
- Open the extracted folder and locate the file named ‘update.bin’. Ensure the file is in the correct format, as it is crucial for the firmware upgrade.
- Rename the necessary file to ‘update.bin’ if it is not already named so. Make sure the file extension remains ‘.bin’.
- Copy the ‘update.bin’ file to the root directory of your USB flash drive. This means that it should not be inside any folders.
- Insert the USB flash drive into the USB port on the front or back panel of the DVR.
- Navigate to the DVR main menu, then select Info followed by Version. Click on the 'Start' button to initiate the firmware upload from the USB flash drive.
- Wait for the DVR to complete the upload process. A dialog box will appear once the upgrade is finished; click 'OK' to restart the DVR.
- Before upgrading, ensure the DVR is restarted and avoid cutting off power during the upgrade process.
- Once the DVR restarts, restore the default settings to apply the new features.
- Proceed to insert a compatible USB 3G dongle into the DVR.
- Access the DVR menu and select the '3G Setting' option.
- On the 3G setting page, input the necessary parameters to configure the 3G connection.
- After entering all the required settings, click the ‘save’ button to finalize your setup.
- Navigate to the DDNS settings under the Main Menu to enable and configure the CP Plus DDNS settings.
- Create a domain name as per your preference and save it to enable access to your DVR using the hostname.
- Review all input fields to ensure accuracy before finalizing any changes.
- Lastly, you can save, download, print, or share the completed form as needed.
Complete your Cp Plus Dvr Firmware Update Download online today!
Connect Display to CP Plus DVR and Login Settings using CP Plus DVR default settings. Under TCP/ IP settings change the Static Mode to DHCP mode to auto IP Configuration from internet modem/Router. Once DVR is connected to the internet now follow the steps to set up instaon cloud.
Industry-leading security and compliance
US Legal Forms protects your data by complying with industry-specific security standards.
-
In businnes since 199725+ years providing professional legal documents.
-
Accredited businessGuarantees that a business meets BBB accreditation standards in the US and Canada.
-
Secured by BraintreeValidated Level 1 PCI DSS compliant payment gateway that accepts most major credit and debit card brands from across the globe.