Loading
Get Project 20: Web Forms
How it works
-

Open form follow the instructions
-

Easily sign the form with your finger
-

Send filled & signed form or save
How to fill out the Project 20: Web Forms online
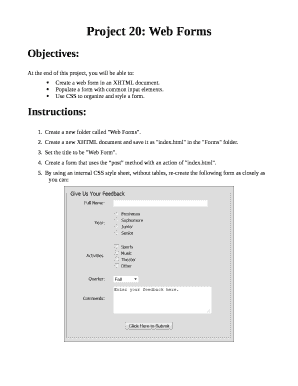
Filling out the Project 20: Web Forms is an essential process for creating web forms efficiently. This guide will provide you with clear, step-by-step instructions to help you complete the form accurately.
Follow the steps to complete the Project 20: Web Forms.
- Press the ‘Get Form’ button to access the form and open it in your preferred editor.
- In your new XHTML document, save it as 'index.html' within the designated 'Web Forms' folder.
- Set the title of your document to 'Web Form' to maintain clarity.
- Create a form element using the 'post' method and set the action attribute to 'index.html' for proper submission.
- Using an internal CSS style sheet, replicate the form design without using tables. Ensure all style requirements are met according to the instructions.
- Implement a drop-down list in the form with the options Spring, Summer, Fall, and Winter, ensuring Fall is preselected.
- Apply a class to the form element with properties such as width (500px), background color, padding, border, font-family (Tahoma), and font-size.
- Use a class for all text labels in the left column, setting their width to 100px, aligning text to the right, and applying float, padding, and margin-right.
- Ensure all form inputs in the right column utilize a class that applies text-align and padding styles.
- Create a class to clear float elements between each section in the form for better organization.
- Design the button with a specific class to set properties like text-align and padding.
- To center the Year, Activities, and Comments labels horizontally, apply a special class with defined height and top padding, ensuring two classes are used on some elements as necessary.
- Once all sections are completed, you can save your changes, download, print, or share the form as required.
Start completing the Project 20: Web Forms online today!
Creating a Web Form Introduction: Creating a Web Form. ... Step 1: Open Notepad. ... Step 2: Save the File As Index. ... Step 3: Type a Standard Html Page's Format. ... Step 4: Give the Page a Name and Create the Form. ... Step 5: Add Fields to the Form. ... Step 6: Go to Your Documents Folder and Open the Web Page.
Industry-leading security and compliance
US Legal Forms protects your data by complying with industry-specific security standards.
-
In businnes since 199725+ years providing professional legal documents.
-
Accredited businessGuarantees that a business meets BBB accreditation standards in the US and Canada.
-
Secured by BraintreeValidated Level 1 PCI DSS compliant payment gateway that accepts most major credit and debit card brands from across the globe.