Loading
Get Receipt For Goods Template
How it works
-

Open form follow the instructions
-

Easily sign the form with your finger
-

Send filled & signed form or save
How to fill out the Receipt For Goods Template online
Creating a Receipt for Goods is essential for tracking deliveries and managing inventory effectively. This guide provides a step-by-step approach to filling out the Receipt for Goods Template online, ensuring accuracy and clarity in your documentation.
Follow the steps to complete the Receipt For Goods Template effectively.
- Press the ‘Get Form’ button to access the Receipt For Goods Template and open it in your digital editor.
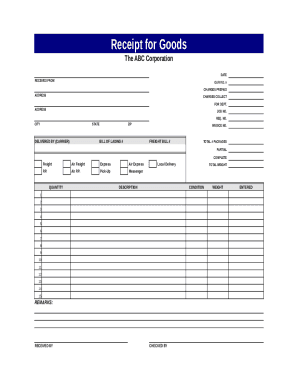
- Enter the date at the top of the form. This indicates when the goods were received.
- Fill in the section labeled 'Received From' with the name of the supplier or company providing the goods.
- Complete the field for 'Our P.O. #'. This is your purchase order number related to the received goods.
- Specify whether the charges are prepaid by selecting the appropriate option.
- Input the address of the supplier in the designated address field.
- Indicate if there are any charges collect by filling in the corresponding section.
- Provide the job number and request number (if applicable) in the relevant fields.
- Fill in the details for city, state, and zip code to specify the location from where the goods are dispatched.
- Document the carrier's name in the 'Delivered By' section to identify how the goods were delivered.
- Enter the bill of lading number and invoice number for record-keeping.
- Include the freight bill number if applicable, to track shipping costs.
- Indicate the total number of packages received and specify if it is a partial or complete delivery.
- In the freight details section, check the appropriate delivery method such as air freight or local delivery.
- List the quantity and description of items received in the designated rows, noting the condition of each item.
- If necessary, add any additional remarks in the remarks section for clarification.
- Sign off on the document by entering the name of the person who received the goods in the 'Received By' section.
- Record the total weight of the shipment in the total weight field.
- Complete the 'Checked By' and 'Entered' sections to indicate who verified the receipt and entered the details.
- After ensuring all details are accurately filled in, save your changes, download, print, or share the completed form as needed.
Complete your receipts online efficiently using the steps outlined above.
Name of Customer: If the customer don't want to provide their name, just put cash . TIN: Ask for the Tax Identification Number (TIN) of the customer. ... Address: Write down the complete address or at least the city of the customer.