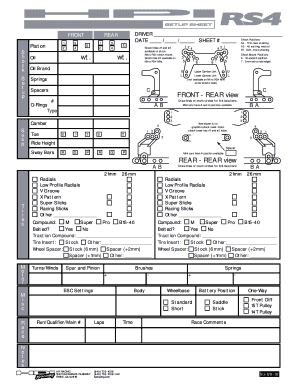
FRONT S h o c k S e t u p 1 2 Piston 3 4 REAR 5 1 2 3 4 wt. Oil 5 wt. DRIVER DATE / / SHEET # Shock Positionssteering C4 Firm, less Shock holes #1 and #2 available on stock NItro RS4 shock mount.

How it works
  • Open form

    Open form follow the instructions

  • Easily sign form

    Easily sign the form with your finger

  • Share form

    Send filled & signed form or save

How to use or fill out the HPI RS4 Rally Setup Sheet - Notices Patrick Mod Lisme online

This guide provides clear instructions for filling out the HPI RS4 Rally Setup Sheet, which is essential for optimizing the performance of your RC vehicle. By following these steps, you can ensure that every detail of your setup is captured accurately and efficiently.

Follow the steps to complete your HPI RS4 Rally Setup Sheet online.

  1. Click ‘Get Form’ button to access the HPI RS4 Rally Setup Sheet and open it for editing.
  2. Begin filling out the 'Driver' section by entering the name of the person using the setup sheet.
  3. Enter the 'Date' in the specified format of month, day, and year.
  4. Indicate the 'Sheet #' for tracking purposes.
  5. Complete the 'Shock Setup' section, detailing the piston positions and oil specifications, including the brand and weight.
  6. Specify the type of springs and include any spacers you plan to use in the vehicle.
  7. Document your 'ESC Settings' and any race comments for future reference.
  8. Fill in the tire specifications, including type, compound, and whether a traction compound is used.
  9. Indicate the tire insert and wheel spacer preferences.
  10. Proceed to the 'Run/Qualifier/Main #' section and input the necessary details.
  11. Conclude by reviewing all filled sections, making necessary adjustments, and saving your changes.
  12. Finally, download, print, or share the completed form as required.

Start completing your documents online today to streamline your setup process.

Get form

Experience a faster way to fill out and sign forms on the web. Access the most extensive library of templates available.

Related content

manufacturing tailored property: Topics by...

Here, we describe a method for tuning the plasmonic properties of a silver ... We...

Learn more
technological - am Institut für Theoretische...

... 155 management 156 list 157 inc 158 under 159 50 160 been 161 2001 162 ... la 443 44...

Learn more
Questions & Answers

Get answers to your most pressing questions about US Legal Forms API.

Contact support

How do I send a password protected document?

Windows Open or create a document with Microsoft Word. Select “File.” Select “Info.” Select “Protect Document.” Select “Encrypt with Password.” Enter your password and confirm it.

Windows Open or create a document with Microsoft Word. Select “File.” Select “Info.” Select “Protect Document.” Select “Encrypt with Password.” Enter your password and confirm it.

Send messages & attachments confidentially On your computer, go to Gmail. Click Compose. In the bottom right of the window, click Turn on confidential mode . Tip: If you've already turned on confidential mode for an email, go to the bottom of the email, then click Edit. Set an expiration date and passcode. ... Click Save.

Use the “Add Confirmation” option with Gmail. Sending Password Protected PDFs is an easy way to grant secure access to important documents. With the right setup, it's an easy way to keep confidential materials safe and secure.

Head to Adobe's online PDF encryption tool. Click on Select a file and choose the PDF you want to protect. Enter a strong password and confirm it. Download the protected file and attach it to your email.

How to password protect a PDF Click the Select a file button above, or drag and drop a PDF into the drop zone. Enter a password, then retype it to confirm the password. Click Set password. Download the password-protected PDF document, or sign in to share it.

Head to Adobe's online PDF encryption tool. Click on Select a file and choose the PDF you want to protect. Enter a strong password and confirm it. Download the protected file and attach it to your email.

How to unlock a PDF to remove password security: Open the PDF in Acrobat. Use the “Unlock” tool: Choose “Tools” > “Protect” > “Encrypt” > “Remove Security.” Remove Security: The options vary depending on the type of password security attached to the document.

Get This Form Now!

Use professional pre-built templates to fill in and sign documents online faster. Get access to thousands of forms.

If you believe that this page should be taken down, please follow our DMCA take down process here.

Get HPI RS4 Rally Setup Sheet - Notices Patrick Mod Lisme