Loading
Get Rma Form (pdf) - Super Talent
How it works
-

Open form follow the instructions
-

Easily sign the form with your finger
-

Send filled & signed form or save
How to fill out the RMA Form (PDF) - Super Talent online
Filling out the RMA Form (PDF) for Super Talent can be a straightforward process if you follow the necessary steps. This guide will provide clear and detailed instructions to assist you in completing the form accurately and efficiently.
Follow the steps to complete the RMA Form successfully.
- Press the ‘Get Form’ button to acquire the form and open it in your chosen document editor.
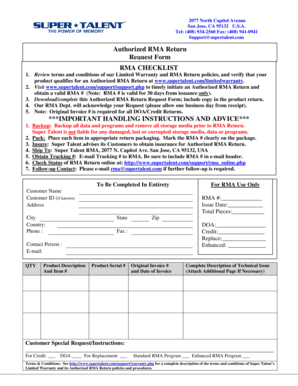
- Begin by filling in the customer information section. Provide your name, customer ID (if known), address, city, state, zip code, country, phone number, and fax number.
- Next, enter the RMA number and issue date in the specified fields. If you have multiple items to return, indicate the total pieces.
- Specify the type of return by checking the appropriate boxes for DOA (Dead on Arrival), credit, or replacement. Select whether you are utilizing the standard or enhanced RMA program.
- Provide a description of the product, including the item number and the product's serial number. This information is essential for processing your return.
- Fill in the original invoice number and the date on the invoice. This step is crucial, as it is required for all DOA and credit returns.
- In the section for the complete description of the technical issue, describe the problem with the product. If more space is needed, you may attach an additional page.
- If you have any special requests or instructions, please write them in the designated field.
- After completing all required fields, review the form for accuracy. Ensure that all information is correct and complete.
- Finally, save your changes. You can download, print, or share the completed form as necessary. Remember to include a copy of the form with your return package.
Complete your RMA Form online today to ensure a smooth return process!
Apply Categories Automatically With Rules in Outlook.com In the Settings dialog box, select Mail > Rules. Select Add new rule. In the Name your rule text box, enter a name for the rule. Select the Add a condition dropdown arrow and choose the condition you want to use to assign a category.