We use cookies to improve security, personalize the user experience, enhance our marketing activities (including cooperating with our marketing partners) and for other business use.
Click "here" to read our Cookie Policy. By clicking "Accept" you agree to the use of cookies. Read less
Read more
Accept
Loading
Form preview
  • US Legal Forms
  • Form Library
  • More Forms
  • More Multi-State Forms
  • Clickshare Instructions

Get Clickshare Instructions

How it works

  1. Open form

    Open form follow the instructions

  2. Easily sign form

    Easily sign the form with your finger

  3. Share form

    Send filled & signed form or save

How to fill out the Clickshare Instructions online

This guide provides a clear and comprehensive approach to filling out the Clickshare Instructions. Whether you are new to digital document management or seeking to streamline your process, the following steps will help you navigate the form efficiently.

Follow the steps to complete the Clickshare Instructions online.

  1. Click the ‘Get Form’ button to access the Clickshare Instructions. This action will open the form in your selected editor for you to begin filling it out.
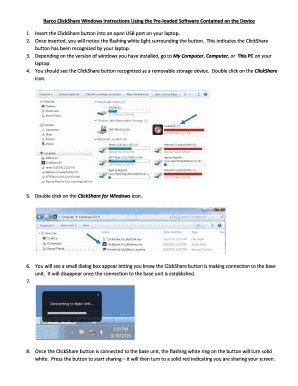
  2. After accessing the form, review the guidance provided regarding the use of the Clickshare button. Familiarize yourself with the initial setup by referring to the included instructions.
  3. Follow the outlined steps to connect the Clickshare button. Begin by inserting the button into an available USB port on your laptop and ensure that it is recognized, as indicated by the flashing white light.
  4. Depending on your Windows version, navigate to My Computer, Computer, or This PC to find the Clickshare button listed as a removable storage device. Double click on the Clickshare icon to proceed.
  5. Continue by double clicking on the Clickshare for Windows icon. This will initiate the connection process.
  6. A dialog box should appear that confirms the Clickshare button is connecting to the base unit. Wait for this box to disappear, indicating a successful connection.
  7. Once connected, the flashing white ring on the Clickshare button will change to a solid white. You can now press the button to start sharing your screen. The button will turn solid red while actively sharing.
  8. After completing your task, remember to save any changes in your document if applicable. You can also download, print, or share the Clickshare Instructions as needed.

Start filling out the Clickshare Instructions online now!

Get form

Experience a faster way to fill out and sign forms on the web. Access the most extensive library of templates available.
Get form

Related content

Barco ClickShare Windows Instructions Using the...
1. Insert the ClickShare button into an open USB port on your laptop. 2. Once inserted...
Learn more
ClickShare Training - USF Sarasota-Manatee
Follow the following instructions to use ClickShare in your classroom: 1. Choose...
Learn more
Barco NV R9861520 ClickShare CSE-200 User Manual
User manual instruction guide for ClickShare CSE-200 R9861520 Barco NV. ... upon with...
Learn more

Related links form

Offer Acknowledgment Form - NY State MLS MA5V Manual 1-8 Xxbrowse 23 1 Sangamon Valley Conference Male Athletic Scholarship

Questions & Answers

Get answers to your most pressing questions about US Legal Forms API.

Contact support

To access ClickShare settings, connect your Button and launch the application on your device. Look for the settings menu, usually found in the dashboard. Here, you can manage options such as display preferences and network connections according to the Clickshare Instructions provided.

To open ClickShare, simply plug in the ClickShare Button to your computer’s USB port. The ClickShare application should launch automatically; if it does not, navigate to your applications folder and start it manually. Follow the Clickshare Instructions for any setup needed to connect to your display.

The default IP address of ClickShare is typically 192.168.1.10. You might need this information for manual configuration or troubleshooting. Refer to your Clickshare Instructions for specific details on access and adjustments to ensure proper connectivity in your setup.

To get ClickShare to work, begin by connecting the ClickShare Button to your laptop. After pairing, click the Button to wirelessly transmit your screen to the projector or display. Make sure your device meets the system requirements outlined in the Clickshare Instructions for a smooth connection.

To configure a ClickShare Button, first connect it to your computer using a USB port. Next, ensure that the device is powered on, and follow the on-screen Clickshare Instructions to establish a connection to your display. Adjust the settings as needed through the ClickShare app or web interface to enhance your presentation experience.

Connecting ClickShare to your computer is simple. Use the ClickShare USB button for direct connection. Plug the button into a USB port, and ensure your display is turned on and connected to ClickShare. Follow the on-screen prompts to start sharing your screen with ease.

To connect through ClickShare, first ensure that your device is on and running the ClickShare app. Then, connect to the ClickShare network and press the ClickShare button. This action establishes a connection, allowing you to share content on the connected display. The Clickshare instructions guide you through this simple process.

Setting up ClickShare is straightforward. Begin by connecting the ClickShare base unit to your display using an HDMI cable. Power on the unit and connect it to your network. Follow the setup wizard on the ClickShare app for easy configuration. Your presentation setup will be ready in just a few minutes.

To connect to ClickShare wirelessly, first ensure your ClickShare device is powered on. Next, install the ClickShare app on your device if you haven't done so yet. Open the app and select your ClickShare device from the list. Follow the on-screen instructions to complete the connection process seamlessly.

The IP address to access the ClickShare admin portal typically starts with 192.168.1.x, but this can vary based on your network configuration. Refer to your ClickShare documentation or the Clickshare instructions for the exact address. Once you enter the correct IP in a web browser, you can manage various settings and functionalities.

Get This Form Now!

Use professional pre-built templates to fill in and sign documents online faster. Get access to thousands of forms.
Get form
If you believe that this page should be taken down, please follow our DMCA take down processhere.

Industry-leading security and compliance

US Legal Forms protects your data by complying with industry-specific security standards.
  • In businnes since 1997
    25+ years providing professional legal documents.
  • Accredited business
    Guarantees that a business meets BBB accreditation standards in the US and Canada.
  • Secured by Braintree
    Validated Level 1 PCI DSS compliant payment gateway that accepts most major credit and debit card brands from across the globe.
Get Clickshare Instructions
Get form
Form Packages
Adoption
Bankruptcy
Contractors
Divorce
Home Sales
Employment
Identity Theft
Incorporation
Landlord Tenant
Living Trust
Name Change
Personal Planning
Small Business
Wills & Estates
Packages A-Z
Form Categories
Affidavits
Bankruptcy
Bill of Sale
Corporate - LLC
Divorce
Employment
Identity Theft
Internet Technology
Landlord Tenant
Living Wills
Name Change
Power of Attorney
Real Estate
Small Estates
Wills
All Forms
Forms A-Z
Form Library
Customer Service
Terms of Service
Privacy Notice
Legal Hub
Content Takedown Policy
Bug Bounty Program
About Us
Blog
Affiliates
Contact Us
Delete My Account
Site Map
Industries
Forms in Spanish
Localized Forms
State-specific Forms
Forms Kit
Legal Guides
Real Estate Handbook
All Guides
Prepared for You
Notarize
Incorporation services
Our Customers
For Consumers
For Small Business
For Attorneys
Our Sites
US Legal Forms
USLegal
FormsPass
pdfFiller
signNow
airSlate WorkFlow
DocHub
Instapage
Social Media
Call us now toll free:
+1 833 426 79 33
As seen in:
  • USA Today logo picture
  • CBC News logo picture
  • LA Times logo picture
  • The Washington Post logo picture
  • AP logo picture
  • Forbes logo picture
© Copyright 1997-2025
airSlate Legal Forms, Inc.
3720 Flowood Dr, Flowood, Mississippi 39232