Get Ar Ar1000rc5 1999
How it works
-

Open form follow the instructions
-

Easily sign the form with your finger
-

Send filled & signed form or save
How to fill out the AR AR1000RC5 online
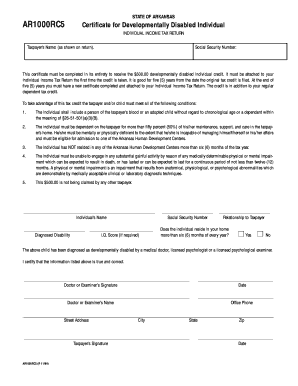
The AR AR1000RC5 is a certificate required to claim the developmentally disabled individual credit on your individual income tax return. Completing this form accurately is essential to ensure that you receive the $500.00 credit. This guide provides step-by-step instructions to help you fill out the form online.
Follow the steps to complete the AR AR1000RC5 form effectively.
- Click the ‘Get Form’ button to access the certificate and open it in your preferred online editor.
- Enter the taxpayer’s name as it appears on the income tax return in the designated field.
- Provide the Social Security Number of the taxpayer in the corresponding section.
- Complete the certification by providing the name of the individual who is developmentally disabled. Include their diagnosed disability and, if required, their I.Q. score.
- Fill in the relationship of the individual to the taxpayer.
- Indicate whether the individual resides in your home for more than six months of every year by selecting 'Yes' or 'No.'
- Ensure that a medical doctor, licensed psychologist, or licensed psychological examiner certifies that the individual is developmentally disabled, and obtain their signature in the appropriate section.
- Include the doctor's or examiner's name, office phone number, street address, city, state, and zip code.
- The taxpayer must sign and date the form in the designated areas to certify that all information provided is true and correct.
- After completing all sections of the form, review the information for accuracy. Once verified, save your changes, download a copy, print it out, or share it as needed for submission.
Complete your AR AR1000RC5 form online today to ensure you receive your developmentally disabled individual credit.
Get form
Related links form
The autism tax credit in Arkansas provides financial relief for families caring for a child diagnosed with autism. This important incentive aims to support educational and developmental needs. If you qualify, you can claim this credit when filing your taxes, including on the AR AR1000RC5 form. It's beneficial to consult with a tax professional to maximize your claims and ensure compliance.