Loading
Get Hcs Multimedia Tutorials Editing Avi Files In Adobe Premiere 34 ... - Groups Haas Berkeley
How it works
-

Open form follow the instructions
-

Easily sign the form with your finger
-

Send filled & signed form or save
How to fill out the HCS Multimedia Tutorials Editing AVI Files In Adobe Premiere online
This guide aims to provide clear and supportive instructions for editing AVI files using Adobe Premiere, ensuring that users can follow each step with confidence. By breaking down the process into manageable sections, we hope to make your editing experience as smooth as possible.
Follow the steps to efficiently edit your AVI files in Adobe Premiere.
- Click ‘Get Form’ button to obtain the form and open it in the appropriate editing tool.
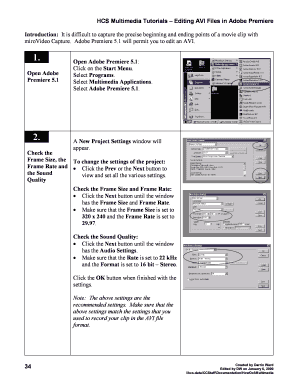
- Open Adobe Premiere 5.1 by clicking on the Start Menu, selecting Programs, then Multimedia Applications, and finally Adobe Premiere 5.1.
- In the New Project Settings window, check the Frame Size, Frame Rate, and Sound Quality. Ensure the Frame Size is set to 320 x 240 and the Frame Rate to 29.97, and set the Sound Quality to 22 kHz and the Format to 16 bit – Stereo. Confirm settings by clicking the OK button.
- Open your AVI file by clicking on the File Menu, selecting Import, and then choosing File to access the Import window. Locate your AVI file on the C: drive and click the Open button.
- Import your clip into the Timeline window by dragging the film clip icon from the Project window to the Video 1A area of the Timeline.
- Locate the desired first frame using the back and forward arrow buttons in the Monitor window. Press the bracket button in the Timeline to mark it, making sure it opens to the right.
- Find the desired last frame following similar navigation steps and press the bracket button until it opens to the left. Align the mouse over the playback line in the Timeline labeled 'Out' before pressing the left mouse button.
- Align the time by clicking the pointer arrow button in the Timeline and moving the video segment line to align it with the 0:00 mark.
- Save your edited movie by clicking on the File Menu, selecting Export, then Movie. Ensure the Video and Audio settings match your earlier specifications, adjusting them if necessary, and finally save the movie to your H: drive or Zip disk instead of the C: drive.
Begin your editing process online by following the steps outlined above.
Related links form
To convert AVI to MP4 in Premiere Pro, import your AVI file into a new or existing project. From the 'File' menu, choose 'Export' and then 'Media'. Set the format to 'H.264' to ensure your output is an MP4 file, and click 'Export' to complete the process.
Industry-leading security and compliance
US Legal Forms protects your data by complying with industry-specific security standards.
-
In businnes since 199725+ years providing professional legal documents.
-
Accredited businessGuarantees that a business meets BBB accreditation standards in the US and Canada.
-
Secured by BraintreeValidated Level 1 PCI DSS compliant payment gateway that accepts most major credit and debit card brands from across the globe.