Loading
Get Onesite Realpage Accounting Month End Checklist
How it works
-

Open form follow the instructions
-

Easily sign the form with your finger
-

Send filled & signed form or save
How to fill out the OneSite RealPage Accounting Month End Checklist online
This guide provides a detailed overview of how to effectively complete the OneSite RealPage Accounting Month End Checklist online. Following these steps will help ensure an accurate and smooth month-end closing process.
Follow the steps to effectively complete the checklist.
- Click the 'Get Form' button to access the checklist and open it in the designated online editor.
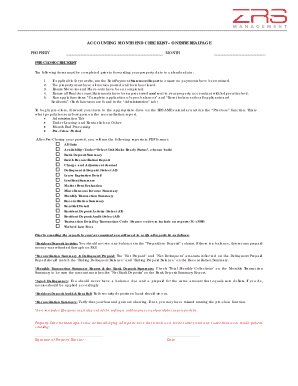
- Review the pre-close checklist items. Ensure that all required tasks, such as verifying RentPayment Statement Reports and processing all move-ins and move-outs, are completed.
- Confirm that all financial transactions are correctly posted and that batches are closed. This will establish the foundation for accurate reporting.
- In the Administration tab, run the 'Complete application of open balances' and 'Reset balances for all applicants and residents' functions to finalize status transitions.
- Forward your property date to the appropriate date on the ZRS AME calendar. This is a crucial step before running the 'Preclose' function.
- Execute the 'Preclose' function to generate the necessary data for your reconciliation report, which will display your profit or loss.
- Run the required reports in PDF format, including the Bank Deposit Summary and Reconciliation Summary, making sure to save each one accordingly.
- Verify that all reports align with one another per the provided guidelines. This ensures accuracy in your final data.
- Once all verifications are completed, email the reports to your accountant for review.
- After receiving confirmation from your accountant, advance the property date by one day to finalize the month-end close.
Complete your documents online efficiently and accurately today!
Change the Required Deposit Switch to the Deposits ledger. Click Change required deposit. Complete the Deposits by code field. Locate the deposit and click Edit. Update the deposit amount and click Post. Click Close.
Industry-leading security and compliance
US Legal Forms protects your data by complying with industry-specific security standards.
-
In businnes since 199725+ years providing professional legal documents.
-
Accredited businessGuarantees that a business meets BBB accreditation standards in the US and Canada.
-
Secured by BraintreeValidated Level 1 PCI DSS compliant payment gateway that accepts most major credit and debit card brands from across the globe.