Loading
Get Creating A Picture Slideshow With Moviemaker
How it works
-

Open form follow the instructions
-

Easily sign the form with your finger
-

Send filled & signed form or save
How to fill out the Creating A Picture Slideshow With MovieMaker online
Creating a picture slideshow can be an enjoyable way to present memories or convey a message. This guide offers clear, step-by-step instructions to help users fill out the Creating A Picture Slideshow With MovieMaker online effectively.
Follow the steps to create your picture slideshow seamlessly.
- Press the ‘Get Form’ button to obtain the form and access it in the online editor.
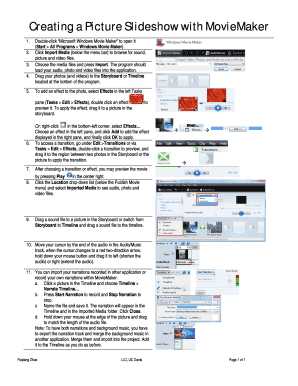
- Launch the Movie Maker application by double-clicking its icon. This can typically be done by navigating to Start > All Programs > Windows Movie Maker.
- Select 'Import Media' located below the menu bar to browse and choose your audio, picture, and video files.
- After selecting the media files, click 'Import' to load your audio, photos, and videos into the application.
- To create your slideshow, drag the selected photos and videos to the Storyboard or Timeline at the bottom of the screen.
- To add effects, go to the Effects option in the left Tasks pane. Double-click an effect to preview it, then drag it to a selected photo in the Storyboard to apply.
- Alternatively, right-click in the bottom-left corner, select 'Effects...', choose an effect in the left pane, and click 'Add' to apply.
- For transitions, access them under Edit > Transitions. Preview a transition by double-clicking it and then drag it to place it between two photos in the Storyboard.
- Once you have chosen your effects and transitions, preview your slideshow by clicking 'Play' on the center right.
- Use the Location dropdown under the Publish Movie menu to select 'Imported Media' to view your media files.
- Drag a sound file to the Storyboard or Timeline to add audio to your images.
- Adjust audio length by moving your cursor next to the end of the audio track until it changes to a red two-direction arrow. You can then drag to shorten or extend the audio length.
- You can add narrations by clicking on a picture in the Timeline and selecting 'Narrate Timeline…' to record your voice.
- After recording, save your narration, which will appear in the Timeline. Make sure to adjust the picture length as needed to align with the audio.
- To add titles, click 'Titles and Credits' or navigate to Tools > Titles and Credits. Select a location for your title on the movie clip or picture.
- Input your title in the text box and customize the animation effect before clicking 'Add Title'.
- If satisfied with your slideshow, click 'Publish Movie', select DVD, and then proceed by clicking 'Next'.
- You will be prompted to save your project. Click 'OK', name your file, and confirm by clicking 'Save'.
- Choose your menu style for the DVD and enter the title in the Disc title box before clicking 'Change Text'.
- Finally, click 'Burn' to create your DVD after inserting a blank disc. Once the process completes, eject your DVD and your slideshow is ready.
Begin creating your picture slideshow online by following these steps today.
How to make a slideshow with Windows Movie Maker? Open Windows Movie Maker. Import your pictures and music files. Add transitions between pictures.
Industry-leading security and compliance
US Legal Forms protects your data by complying with industry-specific security standards.
-
In businnes since 199725+ years providing professional legal documents.
-
Accredited businessGuarantees that a business meets BBB accreditation standards in the US and Canada.
-
Secured by BraintreeValidated Level 1 PCI DSS compliant payment gateway that accepts most major credit and debit card brands from across the globe.