We use cookies to improve security, personalize the user experience, enhance our marketing activities (including cooperating with our marketing partners) and for other business use.
Click "here" to read our Cookie Policy. By clicking "Accept" you agree to the use of cookies. Read less
Read more
Accept
Loading
Form preview
  • US Legal Forms
  • Form Library
  • More Forms
  • More Uncategorized Forms
  • Instructions Collectramatic Fryer Replace Dead Weight

Get Instructions Collectramatic Fryer Replace Dead Weight

Buy Winston service parts online! Factory direct at www.winstonind.com. I N D U S T R I E S INSTRUCTIONS Collectramatic Fryer REPLACE DEAD WEIGHT TOOLS NEEDED: None. Step 1 Close the fryer lid. Step.

How it works

  1. Open form

    Open form follow the instructions

  2. Easily sign form

    Easily sign the form with your finger

  3. Share form

    Send filled & signed form or save

How to fill out the INSTRUCTIONS Collectramatic Fryer REPLACE DEAD WEIGHT online

This guide provides detailed instructions on how to fill out the INSTRUCTIONS Collectramatic Fryer REPLACE DEAD WEIGHT form online. Whether you are a new user or need a refresher, follow these step-by-step instructions to ensure a smooth process.

Follow the steps to complete the form accurately.

  1. Press the ‘Get Form’ button to access the form and open it in the online editing interface.
  2. Carefully review each section of the form to understand the necessary information needed for completion.
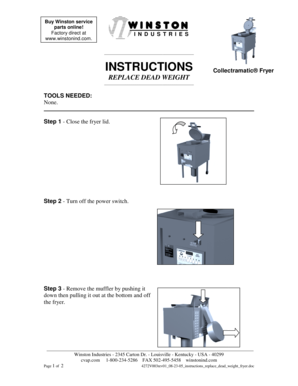
  3. In the section labeled 'TOOLS NEEDED', note that no tools are required for the process outlined in the form.
  4. Follow step-by-step instructions as detailed in the form for replacing the dead weight. Begin with Step 1, which instructs to close the fryer lid.
  5. Proceed to Step 2, where you will turn off the power switch, ensuring safety during the operation.
  6. Continue with Step 3 to remove the muffler. Push it down and pull it out carefully from the fryer.
  7. Move to Step 4, where you will lift and remove the vent back from the fryer.
  8. In Step 5, remove the dead weight by lifting it out of the weight lifter.
  9. In Step 6, replace the old dead weight with a new one. Follow the previous steps in reverse order to reassemble the fryer.
  10. Once all steps are completed, save your changes, download the form, print it for your records, or share it as needed.

Complete your documentation online seamlessly today!

Get form

Experience a faster way to fill out and sign forms on the web. Access the most extensive library of templates available.
Get form

Related content

Owner's Manual Fryer Series - Parts Town
Winston Collectramatic fryers are manufactured to equipment ... For LP Models: remove...
Learn more

Related links form

Chss Form 7 2020 Ppd Form 2020 Lesson Plan Template - Instructors Corner 2020 Observation And Inference Pictures 2020

Questions & Answers

Get answers to your most pressing questions about US Legal Forms API.

Contact support

Create HTML Use a <label> tag with the class named “label”. Add an <input> element with the type, name, and value attributes within the <label> tag.

Create HTML Use a <label> tag with the class named “label”. Add an <input> element with the type, name, and value attributes within the <label> tag.

0:38 7:49 How TO - Display Text when Checkbox is Checked - YouTube YouTube Start of suggested clip End of suggested clip Along with javascript. So first let me write some example like i have some text here. See here iMoreAlong with javascript. So first let me write some example like i have some text here. See here i have some text here i have some text here. And hello hello johnny tutorials.

Tutorial. You can enter tooltip HTML into the label column of checkbox and radio data grids. The tabindex="0" attribute ensures that the user will be able to tab to the tooltip to activate it. The text that displays inside of the tooltip is entered inside of the data-wsf-tooltip attribute.

Two tags are used to create a checkbox: An <input> with type="checkbox" A <label> tag which will contain the text associated with the checkbox we want.

A label and a form control should be associated with each other either implicitly or explicitly. Web browsers provide the label as a larger clickable area, for example, to select or activate the control. It also ensures that assistive technology can refer to the correct label when presenting a form control.

1 Answer Following methods will help you to create a checkbox with a clickable label: 1st Method: Wrap Label Tag. Try wrapping the checkbox within a label tag like this: 2nd Method: Use the for Attribute. You can try using the for the attribute (match the checkbox id) this way: NOTE: ID should be unique on the page.

Get This Form Now!

Use professional pre-built templates to fill in and sign documents online faster. Get access to thousands of forms.
Get form
If you believe that this page should be taken down, please follow our DMCA take down processhere.

Industry-leading security and compliance

US Legal Forms protects your data by complying with industry-specific security standards.
  • In businnes since 1997
    25+ years providing professional legal documents.
  • Accredited business
    Guarantees that a business meets BBB accreditation standards in the US and Canada.
  • Secured by Braintree
    Validated Level 1 PCI DSS compliant payment gateway that accepts most major credit and debit card brands from across the globe.
Get INSTRUCTIONS Collectramatic Fryer REPLACE DEAD WEIGHT
Get form
Form Packages
Adoption
Bankruptcy
Contractors
Divorce
Home Sales
Employment
Identity Theft
Incorporation
Landlord Tenant
Living Trust
Name Change
Personal Planning
Small Business
Wills & Estates
Packages A-Z
Form Categories
Affidavits
Bankruptcy
Bill of Sale
Corporate - LLC
Divorce
Employment
Identity Theft
Internet Technology
Landlord Tenant
Living Wills
Name Change
Power of Attorney
Real Estate
Small Estates
Wills
All Forms
Forms A-Z
Form Library
Customer Service
Terms of Service
Privacy Notice
Legal Hub
Content Takedown Policy
Bug Bounty Program
About Us
Blog
Affiliates
Contact Us
Delete My Account
Site Map
Industries
Forms in Spanish
Localized Forms
State-specific Forms
Forms Kit
Legal Guides
Real Estate Handbook
All Guides
Prepared for You
Notarize
Incorporation services
Our Customers
For Consumers
For Small Business
For Attorneys
Our Sites
US Legal Forms
USLegal
FormsPass
pdfFiller
signNow
airSlate WorkFlow
DocHub
Instapage
Social Media
Call us now toll free:
+1 833 426 79 33
As seen in:
  • USA Today logo picture
  • CBC News logo picture
  • LA Times logo picture
  • The Washington Post logo picture
  • AP logo picture
  • Forbes logo picture
© Copyright 1997-2025
airSlate Legal Forms, Inc.
3720 Flowood Dr, Flowood, Mississippi 39232