Loading
Get Gxadird
How it works
-

Open form follow the instructions
-

Easily sign the form with your finger
-

Send filled & signed form or save
How to fill out the Gxadird online
The Gxadird form is essential for enrolling employees, students, or businesses to receive Accounts Payable payments through direct deposit. This guide will provide you with detailed and clear instructions on how to fill out the Gxadird form effectively, ensuring accuracy and compliance with the necessary guidelines.
Follow the steps to successfully complete the Gxadird form
- Press the ‘Get Form’ button to access the Gxadird form and open it in your document management system.
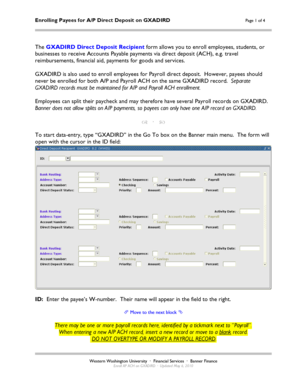
- Enter the payee’s W-number in the ID field. The name will automatically populate in the adjacent field.
- If there are existing payroll records, confirm that ‘Payroll’ is not ticked. Ensure you insert a new record for the A/P ACH.
- Input the bank routing number in the designated field. Ensure you verify the routing number because the bank name will appear automatically.
- Leave the Address Type and Address Sequence fields blank to ensure that all payee payments are directed to ACH.
- Tick the Accounts Payable box to identify the record as one for A/P ACH enrollment.
- Make sure the Payroll box remains unchecked to maintain the separation of records.
- Enter the payee’s account number. If needed, you can use the copy/paste function to transfer this information from an active Payroll record.
- Keep the Checking and Savings fields at their default values.
- Set the Direct Deposit Status to ‘Prenote’ unless you are copying from an active Payroll record, in which case select ‘Active’.
- Enter ‘0’ in the Priority field, as A/P records must use this setting.
- Leave the Amount field blank and keep the Percent field at its default value of 100.
- Remember to save your record before exiting to secure all entered information.
Start filling out your Gxadird form online to ensure timely and accurate payments.
To assign a license to a group Sign in to the Microsoft Entra admin center as at least a License Administrator. Browse to Identity > Billing > Licenses. Select the name of the license plan you want to assign to the group. On the Product page, select Assign.
Industry-leading security and compliance
US Legal Forms protects your data by complying with industry-specific security standards.
-
In businnes since 199725+ years providing professional legal documents.
-
Accredited businessGuarantees that a business meets BBB accreditation standards in the US and Canada.
-
Secured by BraintreeValidated Level 1 PCI DSS compliant payment gateway that accepts most major credit and debit card brands from across the globe.