We use cookies to improve security, personalize the user experience, enhance our marketing activities (including cooperating with our marketing partners) and for other business use.
Click "here" to read our Cookie Policy. By clicking "Accept" you agree to the use of cookies. Read less
Read more
Accept
Loading
Form preview
  • US Legal Forms
  • Form Library
  • Industry Forms
  • Industry Shipping Forms
  • Ez Export

Get Ez Export

Per (name and address including ZIP code) OP-086 Printed in USA 08/15 2. YRC Freight PRO number Phone Number 3. Date *4. P.O. number (other references if applicable) ZIP Code 5. Ultimate consignee (name and address) Phone number *8. Purchaser s name and address (if other than consignee) 6. Consignee s IRS number 9. Purchaser s IRS number 7. Canadian Customs broker (name and address) Phone number *10. Currency of settlement 11. Bill of lading number 12. Canadian Customs clearan.

How it works

  1. Open form

    Open form follow the instructions

  2. Easily sign form

    Easily sign the form with your finger

  3. Share form

    Send filled & signed form or save

How to fill out the Ez Export online

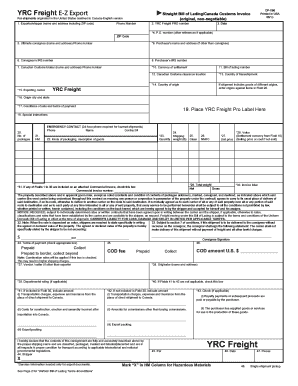
Filling out the Ez Export form is an essential step for efficient shipping from the United States to Canada. This guide provides clear instructions to ensure you accurately complete the form online, facilitating a smooth export process.

Follow the steps to successfully complete the Ez Export form.

  1. Click the ‘Get Form’ button to obtain the form and open it in your editor.
  2. Enter the exporter or shipper's name and address, including ZIP code, in the designated field.
  3. Input the YRC Freight PRO number and the phone number for contact purposes.
  4. Specify the date of shipment in the indicated section.
  5. If applicable, fill in the P.O. number and the ZIP code.
  6. Provide the ultimate consignee’s name and address, along with their phone number.
  7. Enter the consignee's IRS number if available.
  8. If the purchaser's name and address differ from that of the consignee, fill this in as well.
  9. Include the Canadian Customs broker's name and address, along with a phone number for communication.
  10. Indicate the currency of settlement based on the agreed terms.
  11. Document the bill of lading number assigned to the shipment.
  12. Specify the location for Canadian Customs clearance.
  13. Enter the country of transshipment if applicable.
  14. Input the country of origin for the goods being exported.
  15. For multiple origins, be sure to enter them in Field 20 as required.
  16. Identify the exporting carrier, including their city and state.
  17. Fill in the conditions of sale and terms of payment.
  18. Attach the YRC Freight Pro Label in the appropriate section.
  19. Add any special instructions relevant to the shipment.
  20. List the number of packages included in the shipment.
  21. If shipping hazardous materials, provide an emergency contact name and 24-hour phone number.
  22. Describe the kinds of packaging and identification of the goods being sent.
  23. Fill in the shipping quantity and weight of the shipment.
  24. Check the box if fields one through thirty are included in an attached commercial invoice and provide the invoice number.
  25. Document the class number of the shipment.
  26. Provide the NMFC (National Motor Freight Classification) number.
  27. Input the unit price for the goods being shipped.
  28. Specify the total weight, both net and gross.
  29. Indicate the value of the goods, relating to the currency stated earlier.
  30. Calculate and enter the invoice total for the shipment.
  31. Confirm the accuracy of the provided information before finalizing.
  32. Once completed, save your changes, then download, print, or share the form as needed.

Complete your Ez Export document online today for a hassle-free shipping experience!

Get form

Experience a faster way to fill out and sign forms on the web. Access the most extensive library of templates available.
Get form

Related content

Administrative Review Board Decisions - By Name of...
Order of Dismissal (ARB May 7, 2019) (USDOL/OALJ Reporter) | PDF (slip op.) ARB Nos...
Learn more
In tes for Clinton, Bosnian Serb Assemb y r c...
op~ are ,. tber~il. ·ot~sig~ ;" and are not tho .e ~the '''>' """?-. Ex~t or is ~\. I ~...
Learn more
Oki C5750DN User Manual To The 57ce1886 1faa 484b...
... cards to 1.2m banners USABILITY Designed for easy operation by all Leaflets...
Learn more

Related links form

2005 President's Annual Awards Dinner - Oregon State Bar - Osbar A Loved One Has PassedGreer Family Mortuary & Cremation ... 339 - New York State Unified Court System - Courts State Ny Instructions And Forms For Unemployment Insurance Appeals By

Questions & Answers

Get answers to your most pressing questions about US Legal Forms API.

Contact support

To assign a license to a user After you select the license plan, select Assign. On the Assign page, select Users and groups, and then search for and select the user you're assigning the license. Select Assignment options, make sure you have the appropriate license options turned on, and then select OK.

Assign per user licenses to user Sign in to the Microsoft 365 admin center, select Users > Active users. Select the user to whom you'll assign the license. Select Licenses and apps. Select the checkbox for the license you want to assign to the user, and then save your changes.

Assign Office 365 licenses and roles to a user or group Select a user or a group, then check the appropriate boxes to assign licenses and roles to the selected user or group. Click Save and Go Back.

Create a drop-down list Select the cells that you want to contain the lists. On the ribbon, select DATA > Data Validation. In the dialog box, set Allow to List. Click in Source, type the text or numbers (separated by commas, for a comma-delimited list) that you want in your drop-down list, and select OK.

In the admin center, go to the Billing > Licenses page. On the Licenses page, select the row for a specific user. In the right pane, select or deselect the apps and services that you want to give access to or remove access from. When you're finished, select Save, then select Close.

Each license allows a user to Microsoft 365 Apps on up to five desktops, five tablets, and five mobile devices.

Sign in to Office 365 with your admin credentials. Navigate to the admin center. Navigate to Users > Active Users. Check the box next to the user who you want to add or remove a license for.

On the worksheet where you applied the drop-down list, select a cell that has the drop-down list. Go to Data > Data Validation. On the Settings tab, click in the Source box, and then change your list items as needed. Each item should be separated by a comma, with no spaces in between like this: Yes,No,Maybe.

Get This Form Now!

Use professional pre-built templates to fill in and sign documents online faster. Get access to thousands of forms.
Get form
If you believe that this page should be taken down, please follow our DMCA take down processhere.

Industry-leading security and compliance

US Legal Forms protects your data by complying with industry-specific security standards.
  • In businnes since 1997
    25+ years providing professional legal documents.
  • Accredited business
    Guarantees that a business meets BBB accreditation standards in the US and Canada.
  • Secured by Braintree
    Validated Level 1 PCI DSS compliant payment gateway that accepts most major credit and debit card brands from across the globe.
Get Ez Export
Get form
Form Packages
Adoption
Bankruptcy
Contractors
Divorce
Home Sales
Employment
Identity Theft
Incorporation
Landlord Tenant
Living Trust
Name Change
Personal Planning
Small Business
Wills & Estates
Packages A-Z
Form Categories
Affidavits
Bankruptcy
Bill of Sale
Corporate - LLC
Divorce
Employment
Identity Theft
Internet Technology
Landlord Tenant
Living Wills
Name Change
Power of Attorney
Real Estate
Small Estates
Wills
All Forms
Forms A-Z
Form Library
Customer Service
Terms of Service
Privacy Notice
Legal Hub
Content Takedown Policy
Bug Bounty Program
About Us
Blog
Affiliates
Contact Us
Delete My Account
Site Map
Industries
Forms in Spanish
Localized Forms
State-specific Forms
Forms Kit
Legal Guides
Real Estate Handbook
All Guides
Prepared for You
Notarize
Incorporation services
Our Customers
For Consumers
For Small Business
For Attorneys
Our Sites
US Legal Forms
USLegal
FormsPass
pdfFiller
signNow
airSlate WorkFlow
DocHub
Instapage
Social Media
Call us now toll free:
+1 833 426 79 33
As seen in:
  • USA Today logo picture
  • CBC News logo picture
  • LA Times logo picture
  • The Washington Post logo picture
  • AP logo picture
  • Forbes logo picture
© Copyright 1997-2025
airSlate Legal Forms, Inc.
3720 Flowood Dr, Flowood, Mississippi 39232