Loading
Get Universal Receipt Form
How it works
-

Open form follow the instructions
-

Easily sign the form with your finger
-

Send filled & signed form or save
How to fill out the Universal Receipt Form online
Completing the Universal Receipt Form online is essential for managing your reimbursement claims effectively. This guide will provide you with clear, step-by-step instructions to ensure that all necessary information is accurately submitted.
Follow the steps to successfully fill out the Universal Receipt Form online.
- Press the 'Get Form' button to access the Universal Receipt Form and open it in your preferred online editor.
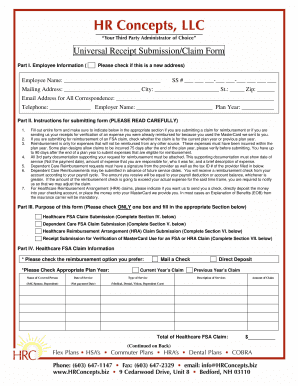
- In Part I, provide your employee information. Fill in your name, social security number, mailing address, email, telephone number, employer name, and plan year. Ensure that you check the box if your address has changed.
- Read the instructions in Part II carefully. Ensure you understand whether you are submitting a claim for reimbursement or verifying previously reimbursed expenses. Attach all required third-party documentation.
- In Part III, select the purpose of your form by checking the appropriate box. You can choose from healthcare FSA claim submission, dependent care FSA claim submission, healthcare reimbursement arrangement claim submission, or receipt submission for verification.
- Proceed to Part IV to fill out the healthcare FSA claim information. Indicate the reimbursement option you prefer, then input the name of the covered person, date of service, type of service, and a description of the services provided. Finally, enter the total amount of the claim.
- In Part V, complete the dependent care FSA claim information. Again, select your preferred reimbursement option, input the provider's name, date of service, type of service, and attach the necessary provider signature and tax ID number. Record the total amount of the claim.
- For Part VI, complete the healthcare reimbursement arrangement claim information. Choose your reimbursement method, provide the name of the covered person, date of service, type of service, description, and total amount for this claim.
- In Part VII, if applicable, indicate which account the reimbursement should be credited to and fill in required details regarding the service.
- Finally, in Part VIII, certify that the information provided is accurate by signing and dating the form.
- After completing all sections, save your changes. You can then download, print, or share your completed Universal Receipt Form.
Start filling out your Universal Receipt Form online today to ensure timely and accurate processing of your claims.
No matter how you're making your receipt, every receipt you issue should include: The number, date, and time of the purchase. Invoice number or receipt number. The number of items purchased and price totals. The name and location of the business the items have been bought from. Any tax charged. The method of payment.