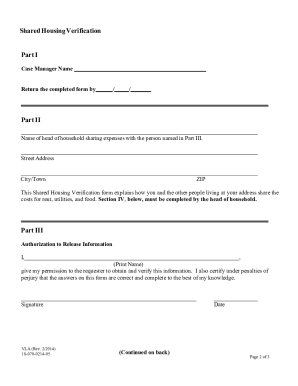
Shared Housing Verification Instructions Part I (to be completed by the case manager): Enter your name and the date the form must be returned. Part II (to be completed by the case manager): Enter.

How it works
  • Open form

    Open form follow the instructions

  • Easily sign form

    Easily sign the form with your finger

  • Share form

    Send filled & signed form or save

How to fill out the Shared Housing Verification Form online

The Shared Housing Verification Form is an essential document to detail how housing expenses are shared among individuals. This guide will help you navigate the process of filling out the form online, ensuring you complete it accurately and efficiently.

Follow the steps to complete the Shared Housing Verification Form.

  1. Click the ‘Get Form’ button to obtain the Shared Housing Verification Form and open it in the designated editor.
  2. In Part I, enter your name as the case manager and the date by which the form needs to be returned.
  3. In Part II, provide the name and address of the head of household sharing expenses with the applicant from Part III.
  4. In Part III, ensure that the Authorization to Release Information is fully completed and signed by the person applying for benefits.
  5. In Part IV, the head of household must provide household information by answering all five questions related to housing status, relationship to the applicant, and names of household members.
  6. Under Rental Information, the head of household should complete the questions about meals provided, rental arrangements, and the amount of rent.
  7. In the Utility Information section, answer one of the questions provided based on who is responsible for paying the utilities.
  8. Finally, in the Head of Household Information, the primary tenant or homeowner must print their name, sign the form, and date it.
  9. Once completed, you can save your changes, download, print, or share the Shared Housing Verification Form.

Complete your Shared Housing Verification Form online today to ensure timely submission!

Get form

Experience a faster way to fill out and sign forms on the web. Access the most extensive library of templates available.

Related content

Income In-Kind/Housing Verification (Supplement to...

Provider Statement Section (Statement of person giving/sharing housing, utilities, food...

Learn more
Room Rental Agreement for Shared Housing...

ROOM RENTAL AGREEMENT. SHARED HOUSING. This is a ... If any portion of it is deducted, an...

Learn more
Section B. System Code and Error Exhibits Overview...

Dec 23, 2010 — Section of the National Housing Act under which the loans are insured...

Learn more
Questions & Answers

Get answers to your most pressing questions about US Legal Forms API.

Contact support

How do I add a title to a drop-down list in Excel?

Insert a drop down list with message In the Data Validation dialog box, switch to the Input Message tab. Make sure the Show input message when cell is selected option is checked. Type the title and message in the corresponding fields (up to 225 characters). Click OK to save the message and close the dialog.

A drop-down list (abbreviated drop-down, or DDL; also known as a drop-down menu, drop menu, pull-down list, picklist) is a graphical control element, similar to a list box, that allows the user to choose one value from a list.

Check the In-cell dropdown box. Select the Input Message tab. If you want a message to pop up when the cell is selected, check the Show input message when cell is selected box, and type a title and message in the boxes (up to 225 characters). If you don't want a message to show up, clear the check box.

1:06 3:23 How to Edit a Drop-Down List in Excel - YouTube YouTube Start of suggested clip End of suggested clip Next click on data tab in the section data tools go to data validation. In the pop-up window thatMoreNext click on data tab in the section data tools go to data validation. In the pop-up window that appeared go to the tab settings. And click into the box source Excel will take you to the location of

The element is most often used in a form, to collect user input. The name attribute is needed to reference the form data after the form is submitted (if you omit the name attribute, no data from the drop-down list will be submitted).

Here are five steps for creating a header row by formatting your spreadsheet as a table: Highlight the data in your spreadsheet. ... Choose the "Home" tab and click "Format as Table" ... Customize the style of your table. ... Confirm the range for your data set. ... Check the "My table has headers" box.

How to Make a Dropdown Menu in HTML Step 1: Add a

Get This Form Now!

Use professional pre-built templates to fill in and sign documents online faster. Get access to thousands of forms.

If you believe that this page should be taken down, please follow our DMCA take down process here.

Get Shared Housing Verification Form