Loading
Get Exchange / Return Form - Shopify
How it works
-

Open form follow the instructions
-

Easily sign the form with your finger
-

Send filled & signed form or save
How to use or fill out the EXCHANGE / RETURN FORM - Shopify online
Filling out the exchange or return form accurately is crucial for a smooth return process. This guide will provide you with clear, step-by-step instructions to assist you in completing the EXCHANGE / RETURN FORM for your Shopify purchase effectively.
Follow the steps to successfully complete your exchange or return form.
- Press the ‘Get Form’ button to access the EXCHANGE / RETURN FORM and ensure it opens in the appropriate editor for completion.
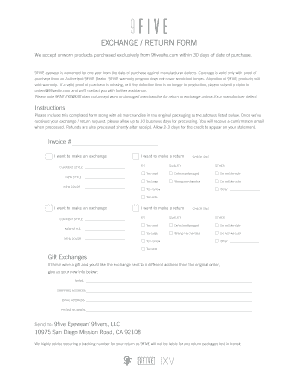
- Fill in the invoice number in the designated field. This helps in identifying your order and speeds up the processing of your request.
- Indicate whether you want to make an exchange or a return by selecting the appropriate checkbox. Choose between 'I want to make an exchange' or 'I want to make a return'.
- In the 'CURRENT STYLE' field, write down the specific style of the product you are returning or exchanging to provide clarity.
- Specify the fit of the item in the 'FIT' section by checking one of the options that best describes your concern, such as 'Too small' or 'Defective/damaged'.
- If you are making an exchange, fill out the 'NEW STYLE' and 'NEW COLOR' fields with your preferred choices. For returns, this step can be skipped.
- If the product was a gift and you wish to send the exchanged item to a different address, complete the fields for NAME, SHIPPING ADDRESS, EMAIL ADDRESS, and PHONE NUMBER.
- Finally, review the completed form for accuracy, then follow the instructions to include the form and merchandise in the original packaging. Make sure to send it to the specified address and consider securing a tracking number.
- After sending your package, await a confirmation email indicating that your request has been processed, and allow time for any refunds to be reflected in your account.
Complete your exchange or return form online today to ensure a smooth process.
3 steps to creating a return label Step 1: Choose a shipping carrier and mail class. When creating your own return label, you'll select which shipping carrier you want to go through and which mail class the package falls under. Step 2: Enter the address. Provide your business's return address. ... Step 3: Pay for postage.