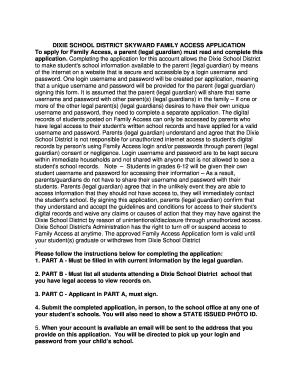
DIXIE SCHOOL DISTRICT SKYWARD FAMILY ACCESS APPLICATION To apply for Family Access, a parent (legal guardian) must read and complete this application. Completing the application for this account allows.

How it works
  • Open form

    Open form follow the instructions

  • Easily sign form

    Easily sign the form with your finger

  • Share form

    Send filled & signed form or save

How to fill out the Skyward Dixie online

This guide provides a comprehensive overview of how to complete the Skyward Dixie application online. By following each step, users can efficiently access their child's school information securely.

Follow the steps to complete the Skyward Dixie application online:

  1. Press the ‘Get Form’ button to access the application and open it for editing.
  2. In Part A, the legal guardian must input their current information, including last name, first name, middle initial, and email address, ensuring all details are accurate.
  3. Move to Part B and list all students attending a Dixie School District school whom you have legal access to view records on. For each student, provide their full legal name, date of birth, school name, grade, relationship to the student, and whether the student lives with you.
  4. Sign in Part C, confirming that the applicant in Part A has completed the application. Include the date of the signature.
  5. Submit the completed application in person to the school office of any of your student’s schools. Remember to present a state-issued photo ID.
  6. Await an email notification confirming that your account is available. You will receive instructions on how to pick up your login and password from your child’s school.

Complete your Skyward Dixie application online today for secure access to your child's school information.

Get form

Experience a faster way to fill out and sign forms on the web. Access the most extensive library of templates available.

Related content

[PDF] Financial and Federal Single Audit - Florida...

Mar 2, 2018 · Our audit disclosed that the Dixie County District School Board...

Learn more
Dixie County advocate - University of Florida

Feb 25, 2010 — Additional Physical Form: Also available on microfilm from the University...

Learn more
Joshua Chamberlain - Wikipedia

Joshua Lawrence Chamberlain was an American college professor from Maine who ... Skyward...

Learn more
Questions & Answers

Get answers to your most pressing questions about US Legal Forms API.

Contact support

How do you highlight an input box in CSS?

Kindly inject the following CSS code to your form: .form-line-active input:focus, .form-line-active textarea:focus, .form-line-active select:focus { border: 1px solid red ! ... box-shadow: 0 0 3px red ! ... -moz-box-shadow: 0 0 3px red ! ... -webkit-box-shadow: 0 0 3px red ! ... } input:focus, textarea:focus, select:focus {

If you need to remove the outline around an input field or a textarea element when the element doesn't have focus, set the border property to none . The border CSS property is used to style the border around an element.

Using CSS outline property The CSS outline property can be used to remove the outline from the text input boxes. Use focus class with outline:none property to the text input box to remove outline in chrome browser.

The focus field can be removed with the help of the blur() method in javascript. Illustration of blur method on clicking a field. Example: In this example, we will focus on a text input field by clicking a button and remove the focus by clicking the remove focus button.

border: none; : This removes the border around the input and textarea elements. By setting the border property to none , we're telling the browser not to draw any border around these elements. outline: none; : This removes the outline around the input and textarea elements.

Generally in the case of Google Chrome Browser, when the input field gets focus then the blue outline occurred on the border of the Input fields. The Task can be done by using the CSS outline property. Example: HTML.

You remove a border by changing the page border setting to None. On the Design tab, choose Page Borders. In the Borders and Shading dialog box, in the Apply to list, choose the page (or pages) you want to remove the border from. Under Setting, choose None.

border: none; : This removes the border around the input and textarea elements. By setting the border property to none , we're telling the browser not to draw any border around these elements. outline: none; : This removes the outline around the input and textarea elements.

Get This Form Now!

Use professional pre-built templates to fill in and sign documents online faster. Get access to thousands of forms.

If you believe that this page should be taken down, please follow our DMCA take down process here.

Get Skyward Dixie