Loading
Get Tmp Dispatch Form
How it works
-

Open form follow the instructions
-

Easily sign the form with your finger
-

Send filled & signed form or save
How to fill out the Tmp Dispatch Form online
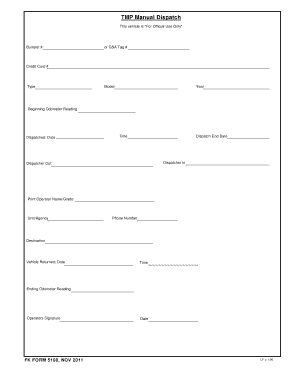
The Tmp Dispatch Form is an essential document used for recording vehicle dispatch information. This guide provides clear instructions on how to complete the form online, ensuring that your vehicle dispatch is accurately documented.
Follow the steps to successfully fill out the Tmp Dispatch Form online.
- Press the ‘Get Form’ button to access the Tmp Dispatch Form and open it in your chosen editor.
- Begin by filling in the bumper number or GSA tag number in the designated field.
- Enter the credit card number in the section provided for payment verification.
- Select the vehicle type from the drop-down menu to specify the kind of vehicle being dispatched.
- Input the model of the vehicle in the designated text box.
- Provide the year of the vehicle to ensure correct vehicle identification.
- Record the beginning odometer reading to document the vehicle's starting mileage.
- Fill in the dispatched date, ensuring it reflects the current dispatch day.
- Input the time of dispatch to complete the timing details.
- Indicate the dispatch end date for expected return.
- Enter the name and grade of the dispatcher in the appropriate fields.
- List the unit or agency responsible for the vehicle dispatch.
- Provide a contact phone number for further communication or inquiries.
- Specify the destination where the vehicle is being dispatched.
- Upon return of the vehicle, fill in the return date and time.
- Record the ending odometer reading to document the mileage upon return.
- The operator must sign in the designated area, confirming the accuracy of the details provided.
- Include the date of the signature to finalize the dispatch documentation.
- Once all fields are filled, users can choose to save changes, download, print, or share the form as needed.
Complete your vehicle dispatch documentation online by following these steps!
Simply select the “Insert” tab and choose “Equation” under the “Symbols” section. If you still do not see the Equation option, you may have to go to “File” > “Options” > “Customize Ribbon“. Select “All Commands” in the “Choose commands from” menu, then add “Symbols” to the tabs listed on the right side of the screen.