Loading
Get Instructions For Filling The Form 49a: 1. Use Only ... - Icici Direct
How it works
-

Open form follow the instructions
-

Easily sign the form with your finger
-

Send filled & signed form or save
How to fill out the Instructions For Filling The Form 49A: 1. Use ONLY ... - ICICI Direct online
This guide provides detailed instructions on how to accurately complete Form 49A for requesting a Permanent Account Number (PAN). By following these steps, you can ensure that your application is completed correctly and submitted without errors.
Follow the steps to complete the Form 49A accurately.
- Click the ‘Get Form’ button to access the form and open it in your preferred editing application.
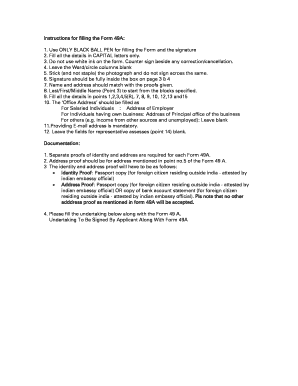
- Use ONLY a black ball pen for filling out the form and signing it.
- Fill all details in capital letters only, ensuring clarity and legibility.
- Avoid using white ink on the form; if you need to make corrections, countersign next to any amendments.
- Leave the Ward/circle columns blank, as instructed.
- Affix a recent passport-sized photograph (3.5 cm x 2.5 cm) securely on the form without any staples, and ensure your signature does not overlap the photo.
- Make sure your signature is fully contained within the designated box on pages 3 and 4.
- Your name and address must match the proofs you are providing for identification.
- Fill the required fields in points 1, 2, 3, 4, 5(R), 7, 8, 9, 10, 12, 13, and 15.
- For the 'Office Address', enter the address of your employer if you are salaried; for others, such as business owners, enter the principal business address.
- Providing an email address is mandatory; ensure it is active.
- Leave the representative assesses fields blank (point 14).
- Prepare separate proof of identity and address as specified in the instructions.
- Sign the undertaking at the bottom of the form, ensuring that your name and the residential address are clearly mentioned.
- After completing the form, you can save changes, download, print, or share the document as needed.
Start completing your Form 49A online today to ensure a smooth application process.
How to create an interactive date field with a date picker in a... Open form editing mode by going to Forms -> Create/Edit Forms. Click on a text field icon on toolbar and put it in your document. Right click on text field -> select Properties. Change to Format tab. Select Date/Time format on the dropdown box.
Industry-leading security and compliance
US Legal Forms protects your data by complying with industry-specific security standards.
-
In businnes since 199725+ years providing professional legal documents.
-
Accredited businessGuarantees that a business meets BBB accreditation standards in the US and Canada.
-
Secured by BraintreeValidated Level 1 PCI DSS compliant payment gateway that accepts most major credit and debit card brands from across the globe.