Loading
Get Vendor Creation Form
How it works
-

Open form follow the instructions
-

Easily sign the form with your finger
-

Send filled & signed form or save
How to fill out the Vendor Creation Form online
The Vendor Creation Form is a critical document designed to facilitate the establishment or update of vendor information within the MTA Business Service Center. This guide offers clear instructions to help users navigate the form efficiently and accurately.
Follow the steps to complete the Vendor Creation Form successfully.
- Click ‘Get Form’ button to access the vendor creation form and open it in the editor.
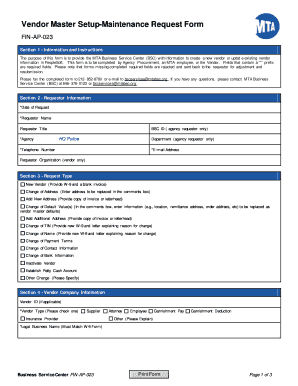
- Fill out Section 1 - Information and Instructions. Ensure you understand the purpose of the form and the importance of completing all required fields, marked with a '*', as incomplete forms will be returned for revision.
- In Section 2 - Requestor Information, provide the date of request, your name, title, agency, telephone number, and email address. If applicable, include the BSC ID and contact details.
- Move to Section 3 - Request Type. Select the appropriate option based on your needs, e.g., 'New Vendor', 'Change of Address', etc. For certain options, you may need to attach supporting documentation.
- In Section 4 - Vendor Company Information, input necessary details such as vendor ID, vendor type, legal business name (matching the W-9), federal tax ID number or social security number, and confirm if you are 1099 applicable.
- Complete Section 5 - Vendor Address Information by entering the invoicing address and any other relevant addresses, focusing on correct city, state, and zip code entries.
- Fill out Section 6 - Vendor Representative Contact Information, providing details of the company representative and indicating if they are the current primary contact.
- Proceed to Section 7 - Certifications, where you will check any applicable business certifications such as MBE or WBE.
- In Section 8 - Payment Details, specify payment terms and method. If opting for ACH, ensure you accurately input the banking details including bank name and account numbers.
- Use Section 9 - Comments for any additional notes or information that may assist in processing your request.
- Once all sections are filled out, review the form for completeness and accuracy. After confirming all information is correct, save your changes, and choose to download, print, or share the form.
Complete your vendor creation form online today and ensure your vendor information is up to date.
A vendor typically needs to complete a vendor registration form or a vendor application form. These forms collect essential information about the vendor and their services. The Vendor Creation Form offers a structured way to capture this necessary data efficiently and accurately.