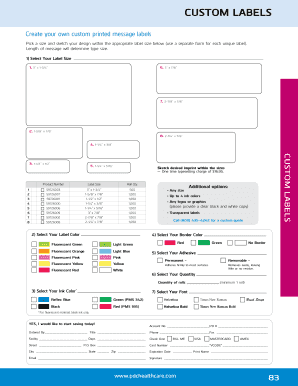
CUSTOM Labels Create your own custom printed message labels Pick a size and sketch your design within the appropriate label size below (use a separate form for each unique label). Length of message.

How it works
  • Open form

    Open form follow the instructions

  • Easily sign form

    Easily sign the form with your finger

  • Share form

    Send filled & signed form or save

How to fill out the How To Create A Microsoft Word Label Template - Online Labels online

This guide provides clear and supportive instructions on how to effectively fill out the How To Create A Microsoft Word Label Template form for custom labels. By following these steps, users will be able to easily create their own printed message labels online.

Follow the steps to complete your custom label template.

  1. Click the ‘Get Form’ button to retrieve the form and open it in the editor.
  2. Select your label size. You have various options, such as 3˝ x 1-3/4˝ or 1-5/8˝ x 7/8˝. Choose the size that fits your design requirements.
  3. Select your label color. You can choose any size and up to four ink colors for your labels. If you want to include logos or graphics, please provide a clear black and white copy.
  4. Choose your border color from a selection of fluorescent and standard colors, ensuring your label stands out as desired.
  5. Decide on the type of adhesive. You can choose between permanent or removable adhesive, ensuring your labels adhere securely or are easily removable as needed.
  6. Specify the quantity of rolls you wish to order, ensuring you select a minimum of one roll.
  7. Select your ink color. If you have chosen fluorescent material, note that only black ink is available.
  8. Choose your preferred font from the dropdown list, such as Helvetica or Times New Roman.
  9. Fill in the account and contact information, including your name, phone number, and email address. This information is essential for processing your order.
  10. Review all selections to ensure accuracy and completeness before proceeding.
  11. After completing the form, you can save changes, download the completed document, print it, or share it as needed.

Start creating your custom labels today by filling out the form online!

Get form

Experience a faster way to fill out and sign forms on the web. Access the most extensive library of templates available.

Related content

Word 365

May 16, 2019 — The template provides the formats — the fonts, styles, margin...

Learn more
Using Word and Excel to create name badges and...

Step-by-Step · On the Mailings tab, choose Start Mail Merge > Labels. · In the Label...

Learn more
Accessing a template in Microsoft Word® for PC

Choose the Mailings tab at the top of the page. 3. Then select Labels to open the Labels...

Learn more
Questions & Answers

Get answers to your most pressing questions about US Legal Forms API.

Contact support

How do I create a fillable label in Word?

Creating a fillable label in Word starts with setting up a new document. Under the 'Developer' tab, you can insert 'Text Form Fields' where users can input their information. After adjusting the design and layout, protect the document to prevent unwanted changes. This method is particularly useful if you understand 'How To Create A Microsoft Word Label Template - Online Labels,' giving you interactive labels for various purposes.

To create an Avery label template in Word, open your document and go to the 'Mailings' tab, then click on 'Labels.' Select 'Options' to find and choose the Avery label you need. You can then input your data and personalize your label design. By following these steps, you can effectively learn 'How To Create A Microsoft Word Label Template - Online Labels' for your Avery products.

Yes, you can create labels online easily using various online tools. Websites like 'Online Labels' allow you to select the label format and customize it to meet your specific requirements. You can design and print your labels directly from your browser without needing to download additional software. This approach benefits anyone wanting a streamlined labeling process.

To create a custom template in Word, begin by designing your document layout as desired. Incorporate elements like text boxes, images, and formatting styles that you find useful. Once satisfied with your setup, save it as a template file. This process ensures you have a readily available format whenever you need to design labels, making 'How To Create A Microsoft Word Label Template - Online Labels' a breeze.

Creating a template in Word online involves navigating to the 'File' menu and selecting 'New.' Here, you can choose a blank document or a pre-made template. Once your document is open, customize it by adding your preferred layout, styles, and any placeholders needed. Finally, save your work and access it anytime through 'Online Labels' for label-specific tasks.

To make a label template in Word online, start by opening Microsoft Word on your web browser. Next, look for the 'Labels' option in the 'Mailings' tab and select it. You can choose from predefined label sizes or create a custom size, ensuring it aligns with your needs. Finally, use 'Online Labels' to seamlessly design and download your label template.

To format a label template in Word, start by opening a new document. Select the 'Mailings' tab, then choose 'Labels.' From there, you can specify the type of label you want to use, and customize your design. Remember, understanding how to create a Microsoft Word label template - Online Labels can greatly enhance your labeling efficiency.

0:22 2:35 How To Make Custom Label Templates In Microsoft Word YouTube Start of suggested clip End of suggested clip This is the space from the top of the label to the edge of the label. Sheet. The side margin can beMoreThis is the space from the top of the label to the edge of the label. Sheet. The side margin can be found by measuring the space from the edge of the label to the edge of the sheet.

Use the following steps to create labels and packaging that will inspire customers to purchase. Get To Know Your Buyers. Who is your target demographic? ... Choose A Label Size. Various lid label sizes on round tins. ... Pick Your Label Material. ... Select A Label Template. ... Setup Your Canvas. ... Design Your Product Label.

About This Article Click the Mailings tab and select Labels. Click Options. Select Avery US Letter or Avery A4/A5 and click OK. Click OK. Click Print.

Get This Form Now!

Use professional pre-built templates to fill in and sign documents online faster. Get access to thousands of forms.

If you believe that this page should be taken down, please follow our DMCA take down process here.

Get How To Create A Microsoft Word Label Template - Online Labels