Open form follow the instructions
Easily sign the form with your finger
Send filled & signed form or save
How to fill out the Imovie Planner online
The Imovie Planner is an essential tool for organizing your movie project. This guide provides clear, step-by-step instructions to help you effectively fill out the form online.
Follow the steps to complete your Imovie Planner with ease.
- Click the ‘Get Form’ button to access the Imovie Planner and open it in your editor.
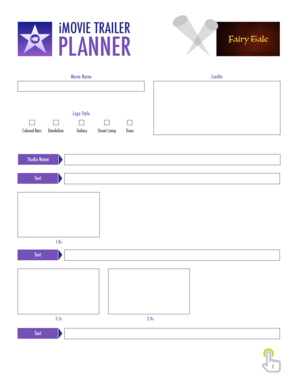
- Begin by entering the title of your movie in the 'Movie Name' field. Ensure that the name is descriptive and aligned with the theme of your project.
- In the 'Credits' section, provide the names of individuals or entities that contributed to your project. List them in the order you wish them to appear.
- Choose a 'Logo Style' that fits your movie theme. You can select from options such as Colored Bars, Dandelion, Galaxy, Street Lamp, or Trees.
- Enter the 'Studio Name' in the designated field, ensuring it reflects your production company or personal brand.
- In the subsequent 'Text' fields, you will specify various texts to be displayed throughout your movie trailer. You can specify the duration for each text indicator, noted in seconds.
- Once all fields are filled, review the information to ensure accuracy and completeness.
- After confirming that all information is correct, you can save your changes, download the form, or print/share it according to your project needs.
Get started with your movie project by completing the Imovie Planner online today!
Experience a faster way to fill out and sign forms on the web. Access the most extensive library of templates available.
Related content
Apple Pages business plan templates are particularly useful for startups as they provide a...
iMovie on Mac is a great built-in to Mac video editor, or easily grabbed from app store...
Once your video ends, it will pop up in the video editing software you selected, this was...
Get answers to your most pressing questions about US Legal Forms API.
How to turn iMovie into MP4 file?
To turn your iMovie project into an MP4 file, you will need to export it first. Go to the 'File' menu, select 'Share', and then choose 'File'. In the export options, ensure that you select the desired settings, and the default file format will often be MP4. The iMovie Planner can support you in preparing your project for optimal playback across various platforms.
Where do iMovie files save?
IMovie files typically save in the Movies folder on your Mac, specifically within your iMovie Library. This location allows for easy access and efficient organization. If you are working on multiple projects, consider creating subfolders to keep your files tidy. The iMovie Planner can help you develop a storage system that complements your workflow.
How to convert iMovie into a file?
To convert your iMovie project into a file, head to the 'File' menu, click on 'Share', and choose 'File'. You will then see options to set the format, resolution, and quality of the final product. Once you've made your selections, click 'Next' to choose the location for saving the file. The iMovie Planner can assist you in determining the best format for your intended use.
Where do iMovie projects get saved?
IMovie projects are saved directly to your Mac's internal storage. By default, they are stored in your Movies folder, making them easy to find later on. It’s wise to regularly back up your projects, perhaps by using an external drive or a cloud service. The iMovie Planner can help structure your backup approach to avoid losing any important work.
How to use iMovie templates?
IMovie templates serve as a fantastic way to kickstart your projects. To use them, simply select 'Create New' from the iMovie interface, and then choose a template that matches your project's theme or purpose. This choice not only saves time but also enhances the overall aesthetic of your video. The iMovie Planner can guide you in selecting the best template for your specific needs.
How to organize footage in iMovie?
Organizing footage in iMovie can streamline your editing process. Start by creating 'Events' for different video segments or occasions. You can then import your clips into these events and label them descriptively for easy access. With the iMovie Planner, you can outline your editing strategy, ensuring that your organization supports your creative vision.
How do I turn an iMovie into a file?
You can turn your iMovie project into a file by first selecting the project you want to export. Navigate to the 'File' menu, and then choose 'Share' and select 'File'. This action opens an options window, allowing you to adjust settings such as resolution and quality before finalizing the export. Utilizing the iMovie Planner can help you organize your project more effectively before exporting.
How to crop landscape video to portrait in iMovie?
To crop landscape video to portrait in iMovie, select your clip and open the cropping tool. Use the 'Crop to Fill' option, then resize the box to fit the portrait orientation. Adjust the framing to highlight essential elements. The iMovie Planner can assist you in making these adjustments with ease.
How do you crop to fill in iMovie?
To crop to fill in iMovie, select the video clip you wish to edit. Open the cropping toolbar and choose 'Crop to Fill' for an effective frame adjustment. This option allows you to eliminate unwanted areas and focus on the key visual elements. Explore the iMovie Planner to enhance your cropping experience.
How to use clip trimmer in iMovie?
Using the clip trimmer in iMovie is straightforward. Click on your clip in the timeline, then click the 'Trim' button. You can drag the ends of the clip to trim your footage accurately. The iMovie Planner will assist you in organizing your clips efficiently during this process.
Use professional pre-built templates to fill in and sign documents online faster. Get access to thousands of forms.
If you believe that this page should be taken down, please follow our DMCA take down process here.