Loading
Form preview
  • US Legal Forms
  • Form Library
  • More Forms
  • More Multi-State Forms
  • Printable Bias Tape Maker 2020

Get Printable Bias Tape Maker 2020-2026

How it works

  1. Open form

    Open form follow the instructions

  2. Easily sign form

    Easily sign the form with your finger

  3. Share form

    Send filled & signed form or save

How to use or fill out the Printable Bias Tape Maker online

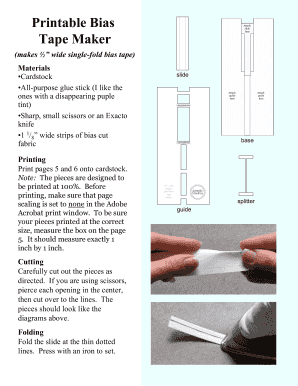
The Printable Bias Tape Maker is a user-friendly tool designed to assist individuals in creating ½ inch wide single-fold bias tape from fabric. This guide provides clear, step-by-step instructions to navigate each section of the form online, ensuring an efficient and effective experience.

Follow the steps to fill out the Printable Bias Tape Maker form effectively.

  1. Press the ‘Get Form’ button to access the Printable Bias Tape Maker and open it in your editing tool.
  2. Review the materials required for making the bias tape, including cardstock, glue stick, scissors or an Exacto knife, and 1 1/8 inch wide strips of bias cut fabric.
  3. Ensure to print pages 5 and 6 on cardstock at 100% scaling. Before printing, set page scaling to 'None' in the print preferences to guarantee accurate dimensions.
  4. Carefully cut out the pieces indicated in the guide, using scissors or an Exacto knife. Start by piercing the center of each opening before cutting along the lines for precision.
  5. Fold the slide at the thin dotted lines and use an iron to press the folds to set them firmly.
  6. Apply glue to the 'T' shaped section of the base and then place the slide on top, ensuring the folded side faces up.
  7. Open out the folds at the top and stick them against the base. Ensure that the back of the slide is in full contact with the glued area and apply more glue if necessary. Allow this to dry for a few minutes.
  8. Next, apply glue to the side sections of the base while avoiding getting glue on the slide. Place the guide on the base, aligning the outer edges.
  9. Glue the splitter into place and allow everything to dry thoroughly.
  10. To prepare the fabric tape, bring the raw edges together and press them. Trim the end into a point for easier insertion into the bias tape maker.
  11. Insert the pointed end of the tape into the slide through the top two tabs, using a straight pin if necessary to push it through.
  12. With the bias tape maker positioned for easy access, place an iron just below the slide as you pull the tape through, utilizing steam for the best results.
  13. Upon completing your tape, you may choose to save your work, download, print, or share the Printable Bias Tape Maker form.

Start your crafting today by completing the Printable Bias Tape Maker form online!

Get form

Experience a faster way to fill out and sign forms on the web. Access the most extensive library of templates available.
Get form

Related content

The role of 3D printing during COVID-19 pandemic:...
by GA Longhitano · 2020 · Cited by 107 — Bias tape makers are folders that assist the...
Learn more
4-Hers 3D Print Face Shields to Help with...
Apr 13, 2020 — Each print takes about 2.5 hours and can take longer or shorter depending...
Learn more
Operation Manual
a Fold the fabric along the bias. b Attach zigzag foot "J". • For details, refer to...
Learn more

Related links form

Https Dmvca My Salesforce Com Pre-Retirement Lump Sum Beneficiary Designation Form (Active Only) - Calpers Ca Short Term Rental - Talbot County - Talbotcountymd Guidelines For The New York State Certificate Of Live Birth & Quality Improvement 2010

Questions & Answers

Get answers to your most pressing questions about US Legal Forms API.

Contact support

To make your own bias tape, start by selecting a fabric and cutting it into strips at a 45-degree angle to the grain. Then, fold the strip in half lengthwise and press it. Use a Printable Bias Tape Maker to achieve evenly folded edges, making the process quicker and easier.

Yes, making your own bias tape is easy and rewarding. You can use the Printable Bias Tape Maker to simplify the process, ensuring consistent folds and widths. This way, you can choose the perfect fabric that matches your project.

Fabric strips or ribbon can serve as effective substitutes for bias tape. Depending on your project, you can also use pre-made tape if you’re looking for convenience. The Printable Bias Tape Maker gives you the flexibility to create bias tape from any fabric you choose, providing endless options for your designs.

To create double fold bias tape without a maker, start by cutting a strip of fabric across the bias. Fold the edges inwards to the center and then fold it again, pressing each fold as you go. While it may take a little longer than using a Printable Bias Tape Maker, the process is straightforward and satisfying.

Typically, a package of bias tape contains around 3 to 5 yards of material. This amount is often sufficient for various sewing projects. With a Printable Bias Tape Maker, you can make as much bias tape as you need, tailoring your supply to fit your project.

For a 25mm bias tape maker, cut your fabric strips approximately 50mm wide. This width allows for effective folding and provides a neat finish. With a Printable Bias Tape Maker, you can easily create bias tape of the desired width, making your sewing projects more enjoyable and efficient.

Sewing pre-made bias tape starts with positioning the tape over the fabric edges. Pin the tape in place and sew close to the edge, making sure the tape is firmly attached to the fabric. This method helps in maintaining a neat edge finish. If you utilize a Printable Bias Tape Maker, you can ensure that your tape width is consistent, enhancing your overall sewing experience.

To join two pieces of bias tape together, place the end of one piece on top of the other at a slight angle. Stitch across the angle to create a secure join that maintains the bias tape's integrity. This technique ensures a smooth transition when working on larger projects. A Printable Bias Tape Maker can assist in preparing the bias tape, making this joining process easy.

To join premade bias tape, align the ends of the tape, and overlap them slightly. Sew a straight line across the overlapping section to secure the tape together. This method provides a strong join that enhances durability. Using a Printable Bias Tape Maker allows you to create premade tape quickly and efficiently for all your projects.

Joining binding strips at the end requires a careful approach. Start by overlapping the ends of the strips slightly, then stitch them together at a diagonal to create a seamless connection. This method ensures the binding lies flat and looks professional. For consistent results, consider using a Printable Bias Tape Maker for your bias strips.

Get This Form Now!

Use professional pre-built templates to fill in and sign documents online faster. Get access to thousands of forms.
Get form
If you believe that this page should be taken down, please follow our DMCA take down processhere.

Industry-leading security and compliance

US Legal Forms protects your data by complying with industry-specific security standards.
  • In businnes since 1997
    25+ years providing professional legal documents.
  • Accredited business
    Guarantees that a business meets BBB accreditation standards in the US and Canada.
  • Secured by Braintree
    Validated Level 1 PCI DSS compliant payment gateway that accepts most major credit and debit card brands from across the globe.
Get Printable Bias Tape Maker
Get form
  • Adoption
  • Bankruptcy
  • Contractors
  • Divorce
  • Home Sales
  • Employment
  • Identity Theft
  • Incorporation
  • Landlord Tenant
  • Living Trust
  • Name Change
  • Personal Planning
  • Small Business
  • Wills & Estates
  • Packages A-Z
  • Affidavits
  • Bankruptcy
  • Bill of Sale
  • Corporate - LLC
  • Divorce
  • Employment
  • Identity Theft
  • Internet Technology
  • Landlord Tenant
  • Living Wills
  • Name Change
  • Power of Attorney
  • Real Estate
  • Small Estates
  • Wills
  • All Forms
  • Forms A-Z
  • Form Library
  • Legal Hub
  • About Us
  • Help Portal
  • Legal Resources
  • Blog
  • Affiliates
  • Contact Us
  • Delete My Account
  • Site Map
  • Industries
  • Forms in Spanish
  • Localized Forms
  • State-specific Forms
  • Forms Kit
  • Real Estate Handbook
  • All Guides
  • Notarize
  • Incorporation services
  • For Consumers
  • For Small Business
  • For Attorneys
  • USLegal
  • FormsPass
  • pdfFiller
  • signNow
  • altaFlow
  • DocHub
  • Instapage
Form Packages
  • Adoption
  • Bankruptcy
  • Contractors
  • Divorce
  • Home Sales
  • Employment
  • Identity Theft
  • Incorporation
  • Landlord Tenant
  • Living Trust
  • Name Change
  • Personal Planning
  • Small Business
  • Wills & Estates
  • Packages A-Z
Form Categories
  • Affidavits
  • Bankruptcy
  • Bill of Sale
  • Corporate - LLC
  • Divorce
  • Employment
  • Identity Theft
  • Internet Technology
  • Landlord Tenant
  • Living Wills
  • Name Change
  • Power of Attorney
  • Real Estate
  • Small Estates
  • Wills
  • All Forms
  • Forms A-Z
  • Form Library
Customer Service
  • Legal Hub
  • About Us
  • Help Portal
  • Legal Resources
  • Blog
  • Affiliates
  • Contact Us
  • Delete My Account
  • Site Map
  • Industries
  • Forms in Spanish
  • Localized Forms
  • State-specific Forms
  • Forms Kit
Legal Guides
  • Real Estate Handbook
  • All Guides
Prepared for you
  • Notarize
  • Incorporation services
Our Customers
  • For Consumers
  • For Small Business
  • For Attorneys
Our Sites
  • USLegal
  • FormsPass
  • pdfFiller
  • signNow
  • altaFlow
  • DocHub
  • Instapage
Social Media
Call us now toll free:
+1 833 426 79 33
As seen in:
© Copyright 1999-2026 airSlate Legal Forms, Inc. 3720 Flowood Dr, Flowood, Mississippi 39232
  • Your Privacy Choices
  • Terms of Service
  • Privacy Notice
  • Content Takedown Policy
  • Bug Bounty Program