Undo And Redo In Legal Internet Templates For Free
How it works
-
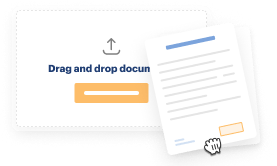
Import your Internet Forms from your device or the cloud, or use other available upload options.
-

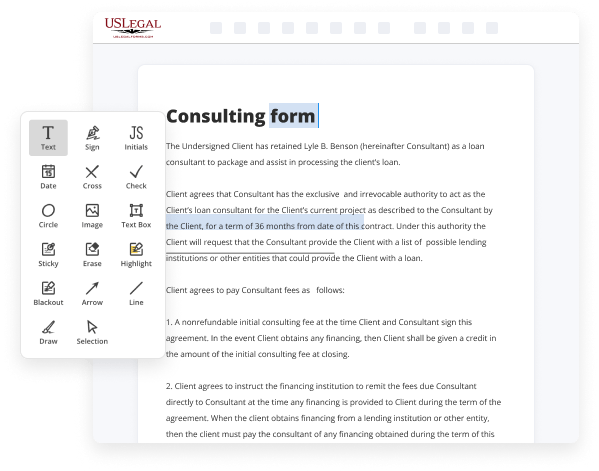
Make all necessary changes in your paperwork — add text, checks or cross marks, images, drawings, and more.
-
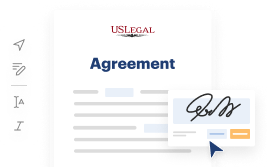
Sign your Internet Forms with a legally-binding electronic signature within clicks.
-
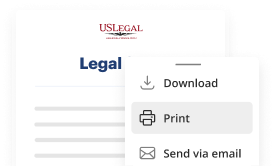
Download your completed work, export it to the cloud, print it out, or share it with others using any available methods.
How to Undo And Redo In Legal Internet Templates For Free
Web-based document editors have demonstrated their reliability and efficiency for executing legal documents. Utilize our secure, rapid, and intuitive service to Undo And Redo In Legal Internet Templates For Free your files whenever necessary, with minimal effort and utmost precision.
And that’s how to prepare and share any personal or business legal documents in a matter of minutes. Give it a try today!
- Upload a document to the editor. You have multiple choices - import it from your device or cloud, or bring it in from a form repository, external link, or email attachment.
- Fill in the empty sections. Position the cursor in the first vacant area and leverage our editor’s navigation to advance step-by-step to ensure nothing is overlooked on your template. Utilize Text, Initials, Cross, and Check functionalities.
- Make your desired changes. Revise the document with added images, draw lines and symbols, highlight important sections, or eliminate any unnecessary ones.
- Generate additional fillable sections. Modify the template with a new area for completion if required. Employ the right-hand toolbar for this, placing each field where you want others to input their information, and designate the remaining areas as required, optional, or conditional.
- Arrange your pages. Remove pages you no longer require or create new ones using the appropriate button, rotate them, or change their sequence.
- Create digital signatures. Click on the Sign option and select how you’d like to add your signature to the document - by typing your name, sketching it, uploading an image, or using a QR code.
- Distribute and transmit for eSigning. Conclude your editing with the Done button and send your version to others for confirmation via an email request, with a Link to Fill option, in an SMS or fax message. If needed, request a swift online notarization.
- Store the document in your preferred format. Download your paperwork, save it to cloud storage in its current format, or convert it as necessary.
Benefits of Editing Internet Forms Online
Top Questions and Answers
In Word, undoing an action involves clicking the Undo button on the toolbar or using the Ctrl Z shortcut. To redo an action, simply click the Redo button or use the Ctrl Y key combination. This functionality aligns perfectly with the concept of Undo And Redo In Legal Internet Templates, making document editing less stressful. Knowing how to use these features will significantly enhance your efficiency in creating legal documents.
Tips to Undo And Redo In Legal Internet Templates For Free
- Use keyboard shortcuts for undo (Ctrl + Z) and redo (Ctrl + Y)
- Click on the edit menu and select undo or redo
- Utilize the toolbar options for undo and redo
- Take advantage of the history panel to go back to a specific action
The ability to undo and redo in legal internet templates is crucial when making changes to important legal documents. This feature allows users to easily revert back to previous versions in case of errors, revisions, or changes in client preferences. It helps ensure accuracy and efficiency in the document editing process.
Related Searches
You can use undo and redo options in various parts of the Squarespace platform to undo recent changes or reapply them again. This allows you to undo any of those actions. Click Undo from the toolbar or Ctrl + Z to undo the most recent action in the list. How to redo an action ... You can revert to the previous version of the website and cancel the undo action. There are two ways to redo an action: ... Click Redo in ... From the Edit menu, select Undo [Name of the recent action] or press Control+Z. Each click reverses one more action. The "Undo Redo" functionality will allow you to revert to the state of your project plan before you made the latest changes. How to Undo the changes? On Windows ... To filter the undo stack to undo only editing operations, click the Undo drop-down arrow and click Editing. If the undo stack doesn't contain at least one ... The eraser lets you erase content you have drawn or written with your Marker. Templates, typed text, or imported documents such as PDFs or ebooks can't be ... Undo and Redo: You can undo or redo any changes that you made to your template, external files, and the canvas within Application Composer. Undo/redo. Undo or redo changes from your current editing session by clicking the undo or redo button above the template preview. If you make a mistake while editing your template, use the undo button to revert it. You can also use the Redo button to reverse that change.
Industry-leading security and compliance
-
In businnes since 1997Over 25 years providing professional legal documents.
-
Accredited businessGuarantees that a business meets BBB accreditation standards in the US and Canada.
-
Secured by BraintreeValidated Level 1 PCI DSS compliant payment gateway that accepts most major credit and debit card brands from across the globe.
-
VeriSign secured#1 Internet-trusted security seal. Ensures that a website is free of malware attacks.