Mark Required Fields In Word Government Templates For Free
How it works
-
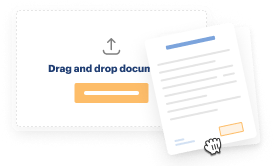
Import your Government Forms from your device or the cloud, or use other available upload options.
-
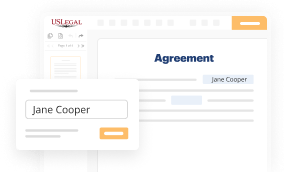
Make all necessary changes in your paperwork — add text, checks or cross marks, images, drawings, and more.
-

Sign your Government Forms with a legally-binding electronic signature within clicks.
-
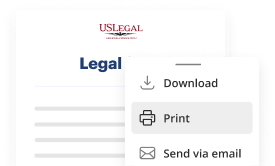
Download your completed work, export it to the cloud, print it out, or share it with others using any available methods.
How to Mark Required Fields In Word Government Templates For Free
Internet-based document editors have demonstrated their reliability and efficiency for executing legal documentation.
And that’s how you can fill out and share any personal or corporate legal documents in a matter of minutes. Give it a try today!
- Upload a file to the editor. You can select from several alternatives - transfer it from your device or the cloud or import it from a template repository, external link, or email attachment.
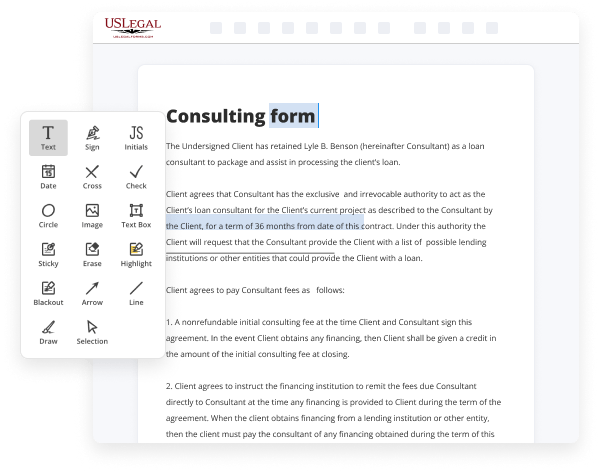
- Complete the blank fields. Position the cursor on the initial unfilled area and utilize our editor’s navigation to proceed step-by-step to ensure that nothing is overlooked in your template. Take advantage of Text, Initials, Cross, and Check tools.
- Make the necessary modifications. Revise the document with inserted images, draw lines and signatures, emphasize significant elements, or eliminate any irrelevant ones.
- Add more fillable fields. Modify the template by including a new area for input if needed. Use the right-side tool pane for this, placing each field where you expect other participants to provide their information, and set the remaining fields as required, optional, or conditional.
- Organize your pages. Eliminate sheets you no longer require or create new ones using the appropriate button, rotate them, or rearrange their sequence.
- Create eSignatures. Click on the Sign tool and decide how to incorporate your signature into the document - by typing your name, sketching it, uploading its image, or utilizing a QR code.
- Distribute and send for eSigning. Finalize your editing with the Done button and send your copy to other parties for consent via an email request, using a Link to Fill option, in an SMS, or through a fax message. Request a swift online notarization if necessary.
- Store the file in the format you require. Download your document, save it to cloud storage in its existing format, or convert it as needed.

Benefits of Editing Government Forms Online
Top Questions and Answers
To mark mandatory fields in Word, use the Developer tab to insert your fields and access their properties. Set the 'Fill-in' option and apply formatting, like bolding or highlighting, to visually indicate those fields are essential. This method is effective when you want to Mark Required Fields In Word Government Templates, ensuring users know which information to prioritize.
Tips to Mark Required Fields In Word Government Templates For Free
- Use asterisks (*) or bold text to highlight required fields
- Offer a legend or key at the beginning of the document explaining the marking
- Ensure consistency in marking throughout the template
- Consider using color coding for visual impact
- Include instructions for how to fill out the required fields
Marking required fields in Word Government Templates is important to ensure that users provide all necessary information. This feature may be needed when creating forms or documents that require specific data to be entered, such as application forms or official reports.
Related Searches
Mark required fields as required by using a red asterisk (*). Use text descriptions. ... Label optional fields with the word ?optional? placed in parentheses. I am trying to make certain form fields in a Word document as mandatory to complete, and have used a Macro that I have found on other sites ... The fields marked with are mandatory is a writable document required to be submitted to the relevant address to provide some info. It must be filled-out and ... 2. Create the fill-in form · Place the mouse where you want to put the fill-in form field. · Click the "Developer" tab, then select "Design Mode.". Hi, This article is about making fields Mandatory for Templates. I have seen many use cases where we want some of the fields to be mandatory ... Interactive fields prompt the user to enter specific types of information into a document. Interactive fields are useful for. This template supports the ISCP requirements for FedRAMP. ... of FedRAMP marks: Designation of FedRAMP 3PAO accreditation and FedRAMP Security Authorization ... Mark the document(s) for which you want to create a template. Be sure to mark the Enable Report Templates and, if desired, to allow use of the ... Works well with Salesforce-rich text fields. Ability to upload custom fonts (not possible with Word or PDF templates). This template supports the ISCP requirements for FedRAMP. ... of FedRAMP marks: Designation of FedRAMP 3PAO accreditation and FedRAMP Security Authorization ...
Industry-leading security and compliance
-
In businnes since 1997Over 25 years providing professional legal documents.
-
Accredited businessGuarantees that a business meets BBB accreditation standards in the US and Canada.
-
Secured by BraintreeValidated Level 1 PCI DSS compliant payment gateway that accepts most major credit and debit card brands from across the globe.
-
VeriSign secured#1 Internet-trusted security seal. Ensures that a website is free of malware attacks.